Now that you've selected your Instant Pot model, the very first thing every new Instant Pot owner
should do is verify the proper operation of their new electronic pressure cooker by performing the
water (pressure) test. The water test insures that your Instant Pot can make steam, then build up and
hold the proper level of pressure for a specified amount of time. Once the pre-heating cycle starts it
takes a few minutes for enough steam pressure to build up and escape past the float valve to push-up
and close the float valve. Once the float valve closes it takes another minute or so for the pot to come
to pressure and start the cooking cycle where the display switches from showing “On” to counting
down. After the cooking cycle begins, there should be no visible steam escaping anywhere from the
pot or lid. If you encounter problems during the water test, refer to the Troubleshooting Guide below.
Note: this example of the “water test” uses an older model Instant Pot with a Manual button. As
explained below, newer models don’t have a Manual button, they have a Pressure Cook button.
After performing the water test and verifying that your new Instant Pot is working properly, your next
step should be viewing this short Instant Pot introductory video by Jeffery Eisner from Pressure Luck
Cooking. Jeff’s videos are informative, entertaining, and funny. And his web site is filled with delicious
recipes for people with Instant Pot cooking skills from newbie to advanced.
Another great Pressure Cooking web site with training videos covering almost everything you’ll ever
want to know; from the proper use of your Instant Pot, to making the right choice about the foods you
intend to cook in it. Welcome To The Pressure Cooking School!
Now that you’ve been introduced to the Instant Pot, here are a few things you should know before you
start cooking with your Instant Pot pressure cooker. They are listed in my order of importance.
Why The Instant Pot Needs Water, by Guy Coburn
Before discussing the finer points of using an Instant Pot electronic pressure cooker, let's
take a look at the various models that are available from the Instant Pot Company. This
web page is an excellent reference if you're looking for a buyers guide to pick the Instant
Pot model best suited to your needs. If you already have an Instant Pot continue reading
below.
1.
As a first meal, you can't go wrong making a soup or stew. These are almost impossible to mess up, and
they'll give you confidence using your Instant Pot as you become familiar with it. One of the biggest
mistakes many new Instant Pot owners make is starting off trying to prepare complicated and involved
meals that require some level of skill and familiarity with electronic pressure cooking. Keep it simple to
start, and work your way up to the challenges.
2.
As you gain experience with your Instant Pot you should follow recipes from well known trusted web sites or
cookbooks. Here are some of the more popular web sites for tried and true recipes:
https://pressureluckcooking.com/
https://www.adventuresofanurse.com/
https://thisoldgal.com/
https://rootitoot.com/
https://www.pressurecookrecipes.com/
https://www.hippressurecooking.com/
https://www.melaniecooks.com/category/instant-pot/
https://encouragingmomsathome.com/100-best-kid-friendly-recipes-for-instant-pot-all-kid-approved/
https://encouragingmomsathome.com/100-best-instant-pot-recipes-soups-stews/
https://www.simplyhappyfoodie.com/
https://instantpot.com/top-10-unexpected-ways-to-use-your-instant-pot/
https://encouragingmomsathome.com/100-best-instant-pot-thanksgiving-recipes/
https://thebellyrulesthemind.net/how-to-make-perfect-instant-pot-rice/
https://theholymess.com/20-instant-pot-dump-dinner-recipes/
https://ohsweetbasil.com/category/main-dish/instant-pot/
https://triedtestedandtrue.com/instantpot/
Six Sisters’ Stuff on Youtube
Instant Pot Pressure Cooker Recipies
Food Network Instant Pot Recipes
3.
As a Newbie you should be exposed to as much information as possible about the proper use and care of
your Instant Pot. Here are some links to other Instant Pot Beginners Guides.
https://www.pressurecookingtoday.com/getting-started-with-your-new-electric-pressure-cooker-or-instant-pot/
https://www.thispilgrimlife.com/instant-pot-beginners-video-series/
https://www.crunchycreamysweet.com/2019/01/02/instant-pot-guide/
https://bit.ly/2GZ9WZj
4.
When you first open up your Smart, LUX, DUO or
DUO Plus model Instant Pot, you may be
overwhelmed with all the buttons on the front
panel. Instant Pot Ultra models don't have
buttons, but the functions you select from
spinning and pressing the main selector knob
correspond to the Instant Pot cooking functions
accessed via the front panel buttons. This Amy
+ Jacky web page gives an excellent variety of
Instant Pot Tips that include an explanation of
what the Instant Pot's front panel buttons do,
and how they interact with each other.
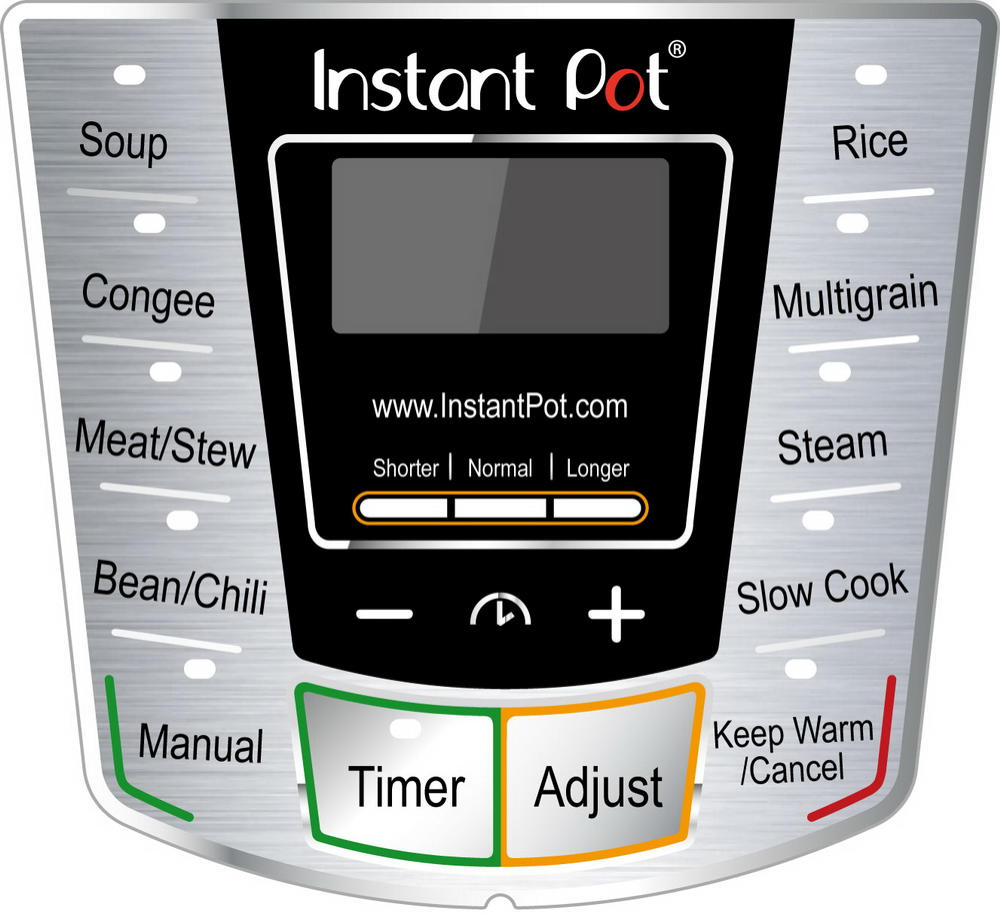
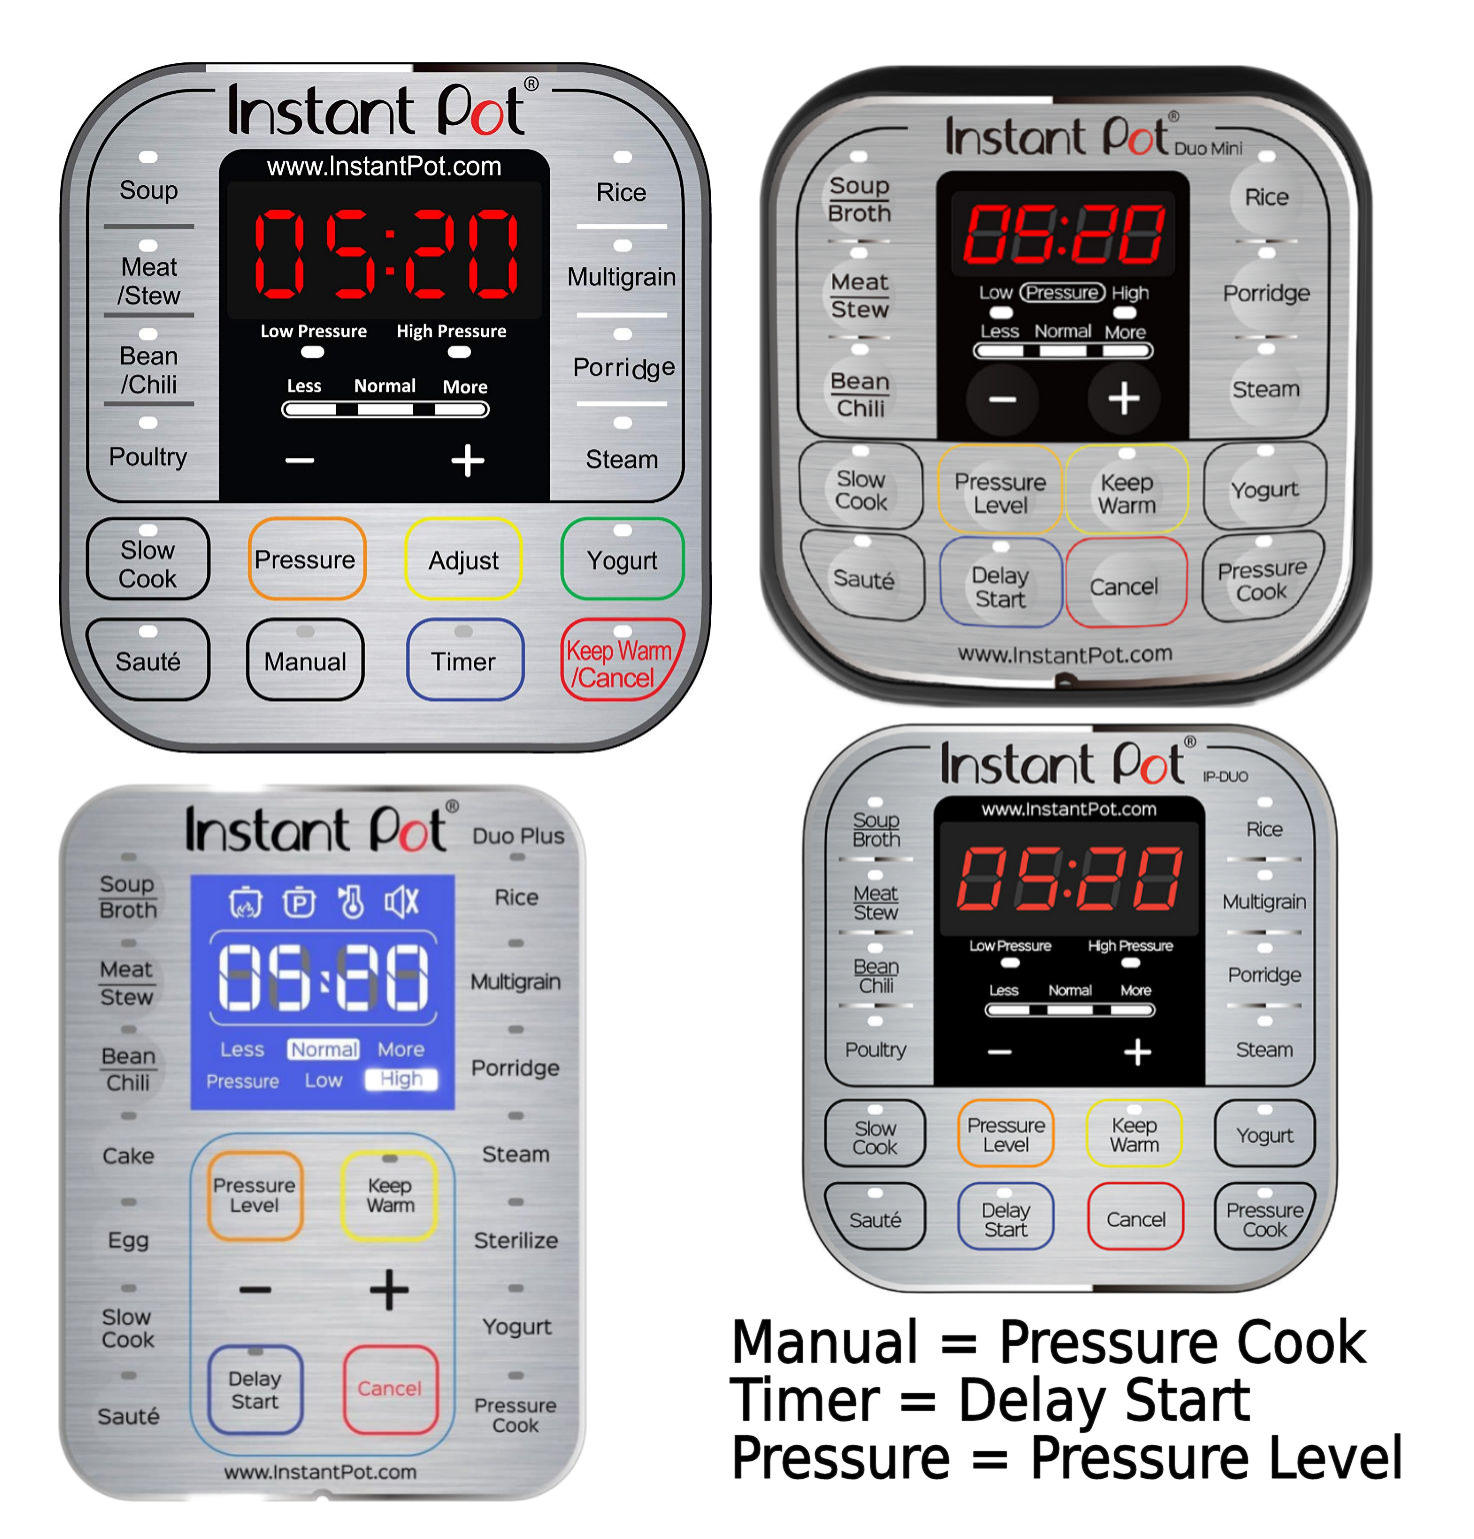
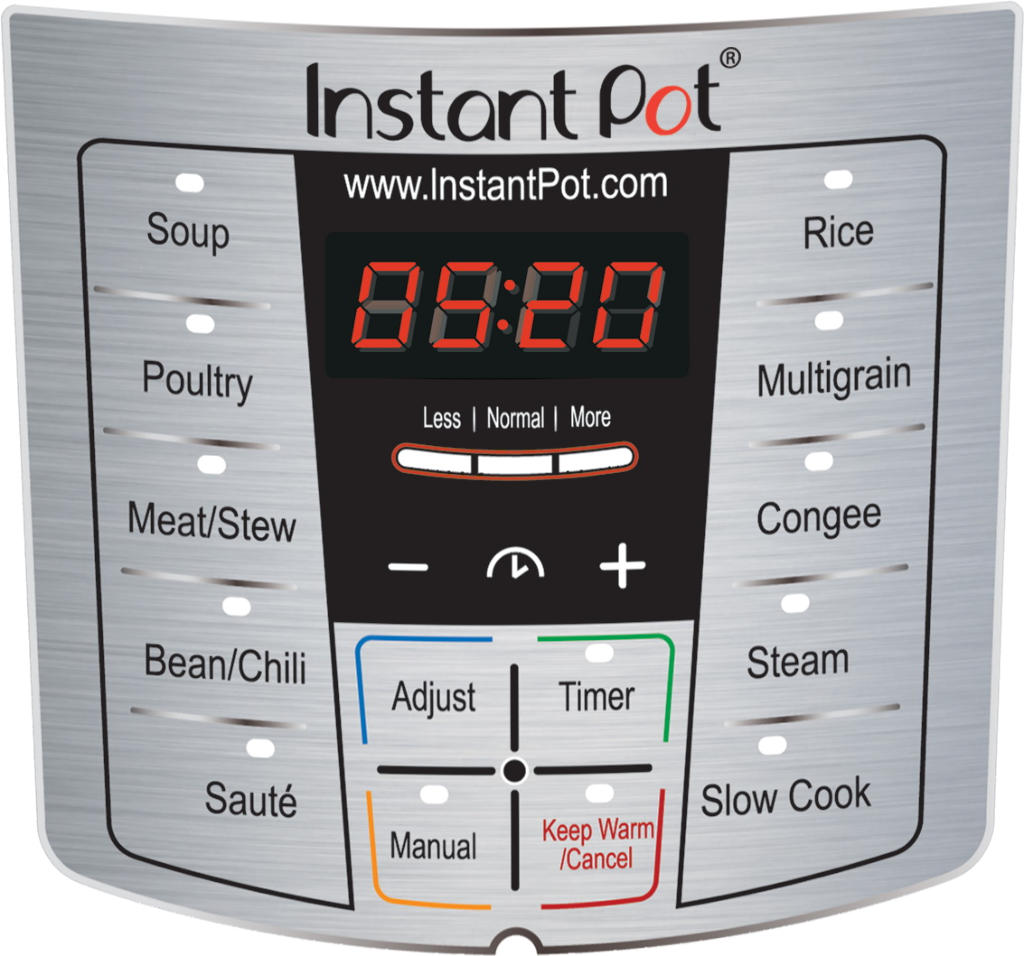
The buttons on these different model IP’s show
how the nomenclature has changed over time.
The older style in the Upper Left is different from
the newer DUO, Smart, and Mini models. The
text in the Lower Right shows the old and new
button names. Many recipes have been around
for years while a tremendous number of older
model Instant Pots were sold, so when you see a
recipe that tells you to use the “Manual” button, this translates into using the “Pressure Cook” button on
the newer models. As shown in the image above-right, the names have also
changed for the “Timer” and “Pressure” buttons. Note: newer models no
longer have an Adjust button. This function is replaced by simply pressing
your program buttons multiple times to scroll through the Less, Normal or
More settings. For example, pressing Sauté multiples times allows you to
chose the desired Heat setting of Less,
Normal or More heat; and pressing a Preset
button such as Meat/Stew multiples times
allows you to chose the desired setting for
Less, Normal or More cooking time. Of
course you can always modify these cooking times by additionally pressing
the “+” or “-” buttons. If you’ll be using the Instant Pot’s Slow Cook
feature, be aware the three temperature settings for Less, Normal, and
More are the equivalent of a Slow Cookers temperature settings of
Warming, Low Heat, and High Heat respectively. Note: The regular
Pressure Lid works just fine for Slow Cooking, just make sure you set the
Pressure Release valve to the Venting position.
The Instant Pot also provides the ability to cook food through Steaming. Steaming is another form of
Pressure Cooking. You close and lock the lid and set the Pressure Release knob just as you would when
pressure cooking your food, then press the Steam button. The difference between Steaming and Pressure
Cooking is that the Instant Pot heats the bottom of the pot to a higher temperature when steaming. So,
when you use Steam mode, you should place your food on the trivet that comes with the Instant Pot to
prevent it from being burned.
The Instant Pot has preset cooking times for different food ingredients and cooking methods. In newer
models, it also remembers your most recent settings per cooking program for a more personalized cooking
experience. To return to the factory default settings, press Cancel to return the cooker to standby mode
displaying OFF. For individual cooking programs reset, press and hold the cooking program key until the
cooker beeps, or for a global reset to restore all preset cooking times, press and hold the Cancel key until
the cooker beeps. To turn off the sounds made by the Instant Pot, press and hold the “-” Key for 3
seconds. To turn the sounds back on, press and hold the “+” key for 3 seconds.
Note: Instant Pot LUX models DO NOT have a Pressure button. The LUX is the Instant Pot company’s entry
level pressure cooker that cooks with High Pressure only; it can not be set to Low Pressure. It also lacks
the Yogurt function found on the other Instant Pot models. However, the procedure described at this web
site will allow you to make Yogurt in your LUX Instant Pot.
5.
Techniques used when cooking on a stove top don’t always apply when pressure cooking.
a.
Thickening - In the traditional method, people add some flour and butter right after caramelizing
onions to give a soup a nice body. Unfortunately, thickening with flour, starch, puree or flakes before
pressure cooking will “solidify” most of the liquid that needs to boil and make vapor to reach pressure.
This could result in displaying the Burn message, the pressure cooker not reaching pressure at all, or if
it does, spurting thick liquid instead of vapor when pressure is released. Add thickeners after cooking
is finished and the lid is opened.
b.
Flavoring with Wine or Liquor – In the traditional method, you might add 1 cup of wine to boil, simmer
and eventually evaporate it’s liquid in a soup. Unfortunately, wine and liquor will not evaporate while
boiling under pressure. The wine will remain as fully flavored and tangy as when it was first added,
dominating the flavor and leaving an unpleasant effect. Instead, reduce the quantity of wine and fully
evaporate it before pressure cooking.
c.
The use of Milk or Cream - In the traditional method, you would add your milk or cream as part of the
cooking process. Unfortunately Milk, Cream and Cheeses don’t do well in the super-heated
environment inside your pressure cooker – they can scorch or curdle. Wait until after pressure cooking
is finished to add them. A few extra minutes of simmering after you pop off the lid are enough to infuse
their flavor and creaminess into the food.
6.
When you see an Electric Pressure Cooker recipe that gives a cooking time, this is NOT the total amount of
time it will take to cook your food. There are actually THREE time periods to be aware of. There’s:
(A) Come to Pressure Time.
(B) Actual Cooking Time.
(C) Natural Pressure Release Time (NPR or NR), or Timed Natural Pressure Release.
Recipes typically only specify a Cooking Time, but they may also suggest a Natural Pressure Release or a
Timed NPR, and (or) a Quick Pressure Release (QPR or QR), sometimes called a Normal Pressure Release,
where you manually open the Sealing/Venting Pressure Release valve.
The “Come to Pressure Time” (A) varies and is dependent on the amount of food and liquid in the pot and
the initial temperature of the food and liquid. This can vary from 10 to 30+ minutes after you seal the
Pressure Release valve and start your cooking program. A cup of water used to steam vegetables would
only take a few minutes to come to pressure; but a pot full of frozen meat, broth, and vegetables could take
30 minutes or more. If you’ll be cooking frozen meat, there are special considerations to be aware of. If
you'll be cooking with the maximum recommended amount of liquid in the pot, and/or you'll have frozen
food in the pot along with the liquid, here's a tip that will speed up cooking in your Instant Pot. Press the
Sauté Mode button then press Adjust, or press Sauté multiple times depending on your model, for “More”
heat. Wait until you see the liquid in the pot start to boil, then press “Cancel” or “Keep Warm/Cancel”, and
proceed with your normal cooking program. Using Sauté Mode to pre-heat the contents of the pot can save
several minutes of overall cooking time to prepare your meal. Also, always assume that a recipe is calling
for the use of High Pressure. Low Pressure is rarely ever used, and will be specifically mentioned if needed.
Lastly, if you live at higher altitudes you need to make adjustments to the cooking time given in your
recipes. The cooking guide shows the normal cooking time for various types of food, along with the
adjustments needed for high altitude pressure cooking.
When you close and seal the lid, and press Manual or Pressure Cook, this is what happens:
•
First, the liquid in the pot is boiled to make steam. The steam escapes through the pop-up float valve, and
when the volume of steam passing through the valve becomes great enough, the float valve pops-up (closes)
and the pot starts to build up pressure. Different model Instant Pots have float valves that are either flush
with the lid, or raised above the lid when closed. (for a more detailed explanation of this process review the
Newbie Guides page on Why The Instant Pot Needs Water)
•
When sufficient pressure is reached inside the pot, the cooking time (B) starts and the front panel display
switches from showing “On”, to showing the Cook Time that you programmed in minutes. During the
Cooking Time the IP display counts down until it reaches "0" then the display switches to show either "L0:00"
or "00:00" depending on your model. At this point cooking is complete and you start the last time period (C),
the “Natural Pressure Release” time (NPR).
•
When "L0:00" or "00:00" is displayed, the IP automatically switches from Cooking Mode to Warming Mode
unless you have manually disabled Warming mode. Instant Pot models with both Pressure Cook and Keep
Warm buttons can use the Keep Warm button to toggle warming mode On and Off. Instant Pot models with
a Manual button operate differently. On these models when you push a cooking Preset button or the
Manual button, the Keep Warm / Cancel button lights up showing that Warming mode is enabled. To run a
cooking program without Warming Mode, double press the Preset or Manual button. The Keep Warm / Cancel
button will light up then go out, showing that Keep Warm mode is now disabled. If enabled, when cooking
finishes, Warming Mode begins and the timer starts counting back up showing the number of minutes that
have elapsed since cooking has finished. During the post cooking time period (Natural Pressure Release Time)
you are letting the Instant Pot sit so it can naturally reduce its internal steam pressure without opening the
Sealing/Venting valve. Some recipes require an NPR time, others do not. If a recipe says to perform a
Natural Pressure Release, this means you let the pot sit undisturbed until its internal pressure is lowered to
the point where the float valve drops open on it own. If a recipe says to perform a 15 minute Natural
Pressure Release, this means you should let the Instant Pot sit for 15 minutes undisturbed after cooking
finishes and Warming mode starts, then perform a QPR (Normal Release) by opening the Sealing/Venting
valve to manually release any remaining pressure. If you are cooking meat, it’s always a good idea to have at
least a 15 to 20 minute NPR time. Note: one of the Instant Pots safety feature
prevents you from opening the lid while the float valve is still closed (popped-
up).
•
Recipes that fill the pot with liquid, or contain thick or starchy
food, usually specify a minimum NPR time of 15 minutes, and
sometimes require a full Natural Pressure Release. Thick or
starchy foods can, in rare occasions, pose an eruption hazard if
pressure is released too quickly. When cooking something thick
such as oatmeal, applesauce, pasta and split peas/lentils, you should
give the Instant Pot base unit a shake before opening the lid. Refer to
this website for further details. When the NPR time has elapsed, turn
the Sealing/Venting valve to the Venting position to release pressure. If
you are cooking meat, it’s always a good idea to let the pot sit for a Full
Natural Pressure Release. If this isn’t possible, have at least a 15 to 20
minute NPR time. Releasing pressure in a pot too soon that’s nearly full or
contains thick or starchy liquids could result in an eruption of the contents spurting out
from the Sealing/Venting valve.
3.
Become familiar with the terms Natural Pressure Release (NPR), and Quick Pressure Release (QPR). This is
what determines the amount of time it takes for time (c) above to finish. A QPR means you turn the
Sealing/Venting valve to the Venting position even though there may still be steam pressure in the pot. A
NPR means you should let the Instant Pot release its pressure naturally, without touching the
Sealing/Venting valve to bleed off pressure; eventually the pop-up float valve will drop on its own. Some
recipes will specify either a QPR, or NPR with a limited time period, or a combination of both. If a NPR time
is given, then let the IP sit untouched for the amount of time specified in the recipe after cooking has
finished, then manually open the Sealing/Venting valve to release pressure. You can't open the pot's lid
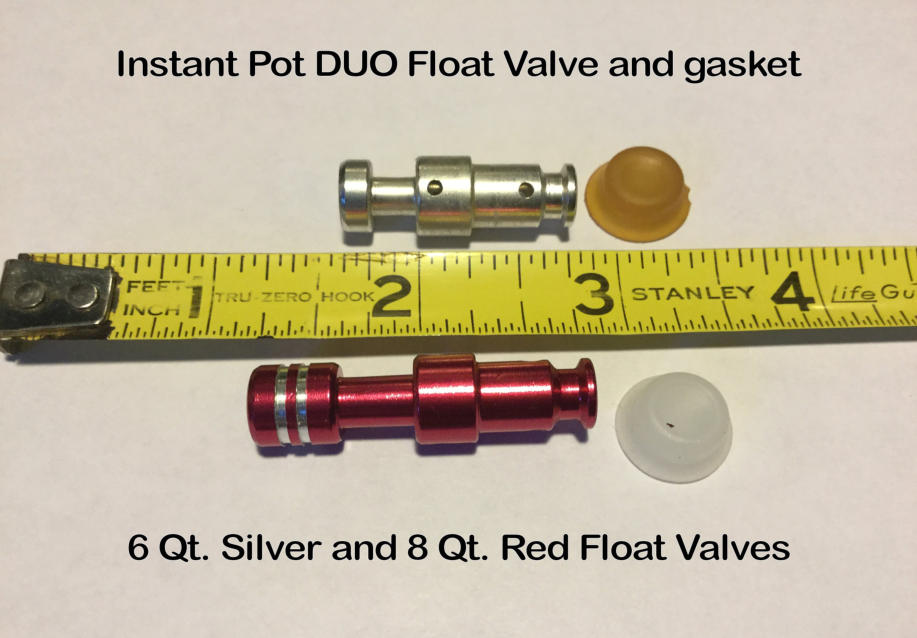
until the silver pop-up valve (red on the 8 qt. model) opens (drops down) on its own. Some recipes may
cause foaming or spitting liquid if pressure is released too quickly; in these cases a longer NPR time is
recommended before doing a QPR. This web site explains Instant Pot abbreviations and terminology.
Some recipes may specify sequential cooking times. Items that take longer to cook in a Pressure Cooker
like dried beans, could be cooked in the same pot with other items that take far less cooking time like meat
or fish, if the cooking process is broken up into multiple steps. An example of this might be to cook the
dried beans for 45 minutes, then perform a NPR or QPR, open the lid, add the fish or meat, and program the
pot to continue cooking for another few minutes.
4.
Remember that a pressure cooker only cooks with steam that comes from boiling liquid. In general,
everything you cook must contain at the very minimum a cup of thin liquid, such as water, or broth. You
can’t dump a jar of thick sauce in a pressure cooker and expect it to cook. It has to turn liquid into steam.
This is a major cause of problems when people find their pressure cooker isn’t coming up to pressure
because they tried to cook something like a very thick chili or sauce that didn’t have enough liquid water to
create enough steam pressure. If this happens, all you can do is either use the Sauté mode, or the Slow
Cooker mode to finish your meal.
Another problem that some people experience is their food comes out overcooked, undercooked or dry.
Generally, this can happen if cooking time is wrong for the contents, or there isn’t enough liquid placed in
the pot before cooking starts, or you are cooking something like pasta that's absorbed much of the liquid in
the pot as it cooks, leaving insufficient liquid to maintain sufficient steam pressure.
This web page has suggested cooking times for various types of food, along with information about the
proper type of pressure release technique to use, and corrections for food that are frozen or being cooked at
high altitudes. A half pound of Pasta can absorb 2 cups of liquid while it’s cooking. If the pot doesn’t have
enough liquid to create steam and hydrate the items in the pot like pasta, your food will not cook
thoroughly; especially if you are using a long time setting, or cooking something large and dense like a
frozen turkey breast or roast. Other causes for roasts or chops being dry after cooking are (1) Failure to
sear the meat which helps lock in juices. (2) Cooking very lean meat that has a low fat content to begin
with. (3) Selecting an overly long cooking time. (4) Cooking very thin cuts of meat that quickly cook
though, causing the loss of meat juices. (5) Releasing pressure too quickly after the meat has been cooked.
This web page is an excellent reference for diagnosing problems with meat being over or under cooked.
5.
Once all of the above is understood and you perform the initial pressure (water) test to verify that your
Instant Pot (not "INSTA-POT") is working properly you'll be exposed to your first QPR. This can be
somewhat frightening to a person who’s never been around a Pressure Cooker, or is old enough to have
been on a train platform during the age of steam engines. At first the instinct for self-preservation kicks in
and you’ll naturally reach for a long stick to open the Sealing/Venting valve to release the steam. After a
few sessions with the IP you’ll become comfortable and be able to open the valve with your LEFT hand
without any fear. I say to use your LEFT hand because if you’re looking at the front of the pot facing the
digital display, the handle on the Sealing/Venting knob is on the left. DO NOT EVER have any part of your
body above the Sealing/Venting valve when you perform a QPR. By using your LEFT hand to turn the valve
knob, your hand will be beside the knob
instead of above it.
6.
When your food is cooked and you've
finished the Quick Release of pressure,
you're ready to open the lid. Turn the
lid counter-clockwise unlocking it, then
lift and tip it up so the back edge of the
lid is lifted up before the front edge. This
lets any remaining steam escape from
the pot at the back, away from you.
Now that you have the lid in your hand
what do you do with it? If you look
closely at the lid you'll see that those
little tabs on each side fit perfectly into the slots on each side handle on the pot body. The IP comes with a
built-in lid holder. This is a great way to store your lid when the pot isn't in use because It lets air circulate
into the pot and around the lid to help remove odors. By the way, the
easiest way to clean your Instant Pot lid is to place it in the upper rack
of your dishwasher, handle side up. You can also pull off the
Sealing/Venting valve knob and place it in the silverware basket for
cleaning.
7.
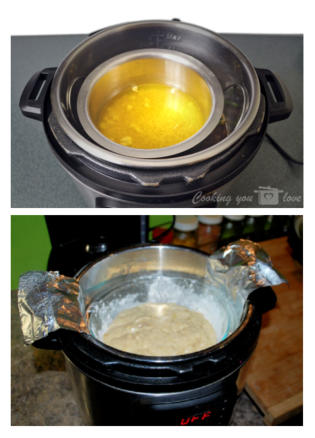
Lastly, you’ll hear people use the term “PIP”, meaning “Pot-In-Pot”
cooking in the Instant Pot. This cooking method is used when you
want to prepare a recipe that doesn’t include enough liquid to make
sufficient steam to build up pressure. What you do is use the Trivet
that came with the Instant Pot; add about a cup and a half of water to
the bottom of your pot (this is what will make the stream to
pressurize the pot and cook your food), and place your uncooked
food into an oven proof cooking pot that will fit inside the Instant Pot
liner. Typically people either use
a tall enough Steaming Rack
under the cooking pot to bring it near the top of the liner, or fashion a
sling out of Aluminum Foil placed under the cooking pot, allowing it to
be lowered into the main pot and later used to lift it out. People use
the PIP method to cook cakes, bread, egg bites, cheesecake, and the
like.
FYI, the 3 qt. Instant Pot liner makes an excellent pot for use in PIP
cooking. It easily fits inside both the 6 and 8 qt. IP DUO models. And it
comes in a non-stick version.
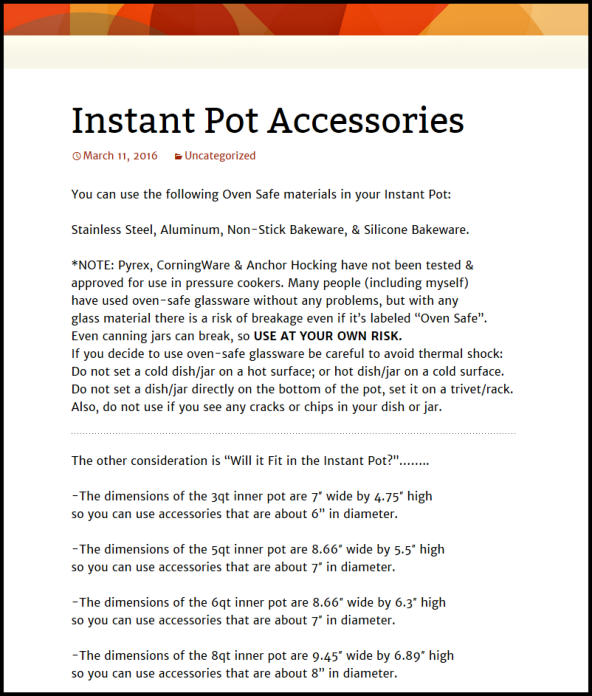
As you become more familiar and comfortable using your Instant Pot
you'll discover that you can make all kinds of things in it using the Pot-In-
Pot cooking method. There are literally dozens of cooking pot accessories
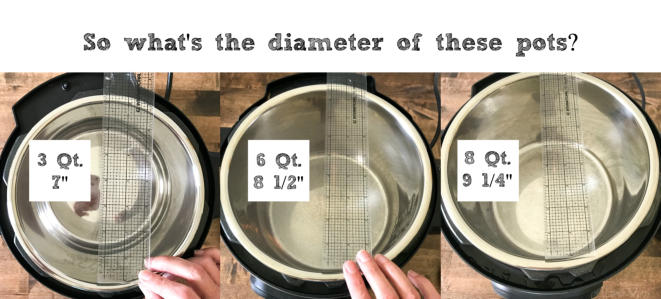
you can purchase. When looking
for accessories to fit inside you
Instant Pot Inner Liner just keep
these dimensions in mind when
ordering your accessories.
Remember, the pot is tapered at the
bottom and looses about ¼” in
width.
This web site lists just a few.
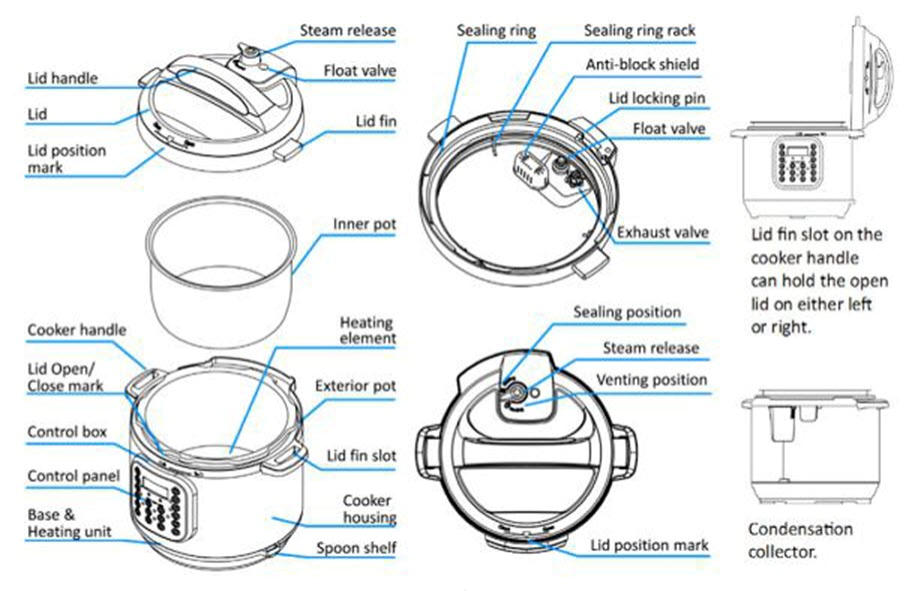
When you talk with other Instant Pot
owners you’ll need to know the names of
the parts that you’ll be talking about. The
most common topic of conversation is the
Lid and its related parts. Here’s a drawing
that shows the Instant Pot parts and their
names. Note: The Lid’s Blocking Shield
(sometimes called the anti-foaming shield)
is the older style that covered both the
Steam Release vent and the Pop-up Float
Valve. The newer model shields only cover
the Float Valve. Click on the drawing
below for an expanded view.
Troubleshooting Pressure Problems
Problems with your Instant Pot during the water test, or not coming to pressure generally fall into one of the following categories: 1. Problems with the components inside the lid. 2. Failure to properly install and/or close the Steam Release knob. 3. Obstructions that prevent the lid from making a tight seal against the inner pot. 4. Failure to produce enough steam to pressurize the pot. 5. Mechanical or Electrical failures preventing the pot from operating correctly. When trying to diagnose a pressurization problem, always start from the beginning. If your pot has been plugged into the wall outlet, unplug it, wait 30 seconds and plug it back in to reset the pots computer. Next, perform the water test. This eliminates the possibility that the the food being cooked is the source of the problem. If the water test works, then it’s not your Instant Pot that’s at fault. Lid Component Problems Problem: This includes a missing, dirty, or improperly installed Sealing Ring, Float Valve, Silicon Float Valve Gasket, Anti-Blocking Shield, or a dented or dimpled inner pot lip. A clean Sealing Ring must be firmly pressed into place so the track (grove) in the gasket completely encases the circular mounting rack that’s located under the lid. Also, the Float valve must be installed with its silicon rubber gasket so that it moves freely up and down in the lid without any signs of binding up. Solution: Verify the Float Valve & gasket, and the clean Sealing Ring are installed properly and that the lid closes and locks into place. This video gives a clear description of removing and reinstalling the Float Valve & gasket and Sealing Ring. Note: this video shows the lid of an Instant Pot Ultra, but the principle is the same for all other model Instant Pots. A dented or otherwise damaged lip on the inner pot can cause a failure to seal in pressure when mated with the sealing gasket. Steam Release Valve Problems Problem: If you’ve removed the steam release knob for cleaning, failure to reinstall the knob properly, or to fully close the Sealing/Venting (pressure release) valve can be the cause of the Instant Pot not coming to pressure. Solution: When the Pressure Release Knob is removed for cleaning it must be firmly pushed down on the steam exhaust stem so it “snaps” into place; then turned 1/4 turn clockwise to the Sealing position before cooking (non Ultra Models). The Steam Release Knob is a calibrated weight that sits on top of the steam release exhaust vent. If food debris or other foreign matter should become lodged in the vent, it could prevent the knob from seating properly over the exhaust vent stem, and prevent the pot from coming to pressure. I recommend you clean your Instant Pot lid in the dishwasher, every few times you use it. Do this by removing the Sealing Ring, Pressure Release Knob, and Anti Blocking Shield and place them in the silverware basket. Then place your lid and Sealing Ring in the upper rack with the handle facing up. Obstructions that prevent Sealing in pressure Problem: Sometimes when you’re putting food into the Instant Pot, large leafy vegetables like Spinach or Cabbage can have a leaf that isn’t fully pushed down into the pot. Food items that drape over the lip of the inner pot can prevent the lid from making a tight pressure seal. Even small food debris like spices or herbs stuck in a wet spot on the lip of the inner pot can prevent the pot from coming to pressure. Solution: If a leaf is left draping over the lip of the inner pot, this can prevent the sealing ring from making a tight seal and could cause a pressurization failure. Make sure all the ingredients are completely enclosed in the inner pot. As a final step before placing the lid on your pot, use a damp cloth to wipe the lip of the inner pot to remove any food debris that might prevent the lid from making a tight seal against the inner pot. Failure to produce enough steam Problem: As mentioned earlier, a pressure cooker only cooks with steam that comes from boiling liquid. If the liquid content in the pot is too thick to boil off water, your pot will not pressurize and chances are good your food will dry out and burn before being cooked. Well though out Instant Pot recipes will take into consideration the amount and types of food being cooked. Some recipes will require one or more cups of thin liquid; while others may require as little as ¼ cup of water. The need for extra liquid in a recipe takes into account the type and amount of food being cooked, combined with the need to add liquid water for the purpose of creating steam. Some Vegetables and Meat release water while they cook. Adding too much extra liquid at the start could produce an overly thin broth. For recipes like this, a balance is made between the need to add extra liquid at the start to build up steam pressure, and the water released into the pot by the ingredients being cooked. Too little liquid at the start, or too little liquid released by the ingredients as they heat up, could result in not enough liquid to create steam, and failure to pressurize. Failure to pressurize can also happen if you have something in the pot that has stuck or burned to the bottom while the pot is trying to build up pressure. Food stuck to the bottom acts as a thermal insulator preventing heat from boiling the liquid into steam. Older Instant Pot models will fail to come to pressure, time out, and start the cooking cycle in WARMING mode without ever coming to pressure. Newer Instant Pots will display the word “Burn” or "burn" on the front panel to indicate the Instant Pot’s computer detected a problem heating the pot. For additional information on what the Burn message means, visit this Amy + Jacky web site. Solution: The best way to prevent pressurization problems caused by the ingredients being cooked, is to follow tried and true recipes and follow them precisely. Don’t try cooking extremely thick sauces without sufficient liquid to build up and maintain steam pressure. When sautéing meat in the Instant Pot make sure when you’re done cooking, the pot is deglazed before starting the pressure cooking cycle. And whenever possible, try to keep easily scorched items from coming in direct contact with the bottom of the cooking pot. Place your large pieces of meat or fish on top of any vegetables you may also be cooking in the pot. The space between vegetables allows your cooking liquid to be in direct contact with the bottom of the pot, insulating the meat from being burned. If you are using the Instant Pots “Steam” selection, in general you should also be using the supplied Trivet to keep you food off the bottom of the pot. The Steam function heats the pot to a higher temperature than the Manual or Preset buttons. Cooking with the Steam button could scorch your food if not used with the Trivet. For additional information on pressurization problems, please visit this web site that discusses all types of pressurization and sealing problems. Mechanical or Electrical Failures, or Worn out Instant Pot components Problem: Of all the types of problems than can prevent the Instant Pot from pressurizing, mechanical or electrical failures are the one type that can’t be overcome by simple adjustments. A breakdown of one of the pots electrical sensors or electronic circuits is a critical failure and the Instant Pot must be professionally repaired or replaced. Parts like the Sealing Ring and Float Valve gasket experience normal wear and tear and have to be replaced periodically. Replacement parts can be obtained directly from the Instant Pot company or from third party parts vendors like Amazon. In some cases the Instant Pot can detect a defective component and display an error message on the front display panel. This web site lists some of the known defects and error codes the Instant Pot can display. A type of pressurization problem that recently appeared is where the Instant Pot comes to pressure and seems to be working normally, but then steam begins to escape through the Pressure Release knob shortly after the control panel display switches from “On” to showing the cooking cycle countdown time. This video shows an example of the problem. The test is started with 2 cups of water, Steam Mode, High Pressure for 3 minutes. When the pot builds up enough steam the float valve closes and the pot starts coming to pressure. Eventually pressure is reached and the display switches from "On" to "3". At this point an on-screen timer shows that less than 30 seconds later the pressure release safety valve is tripped and steam starts escaping from the Pressure Release knob. This is an indication of a mechanical or electrical failure in the pots pressure sensor. The pots computer isn’t being informed that operating pressure has been reached so power can be switched off to the pots heating element. Instead, heat is still being continuously applied until the maximum safe operating pressure has been reached and the safety valve opens bleeding off steam pressure. This problem was solved by filing a support ticket with Instant Pot where they eventually replaced the 8 qt. DUO for free.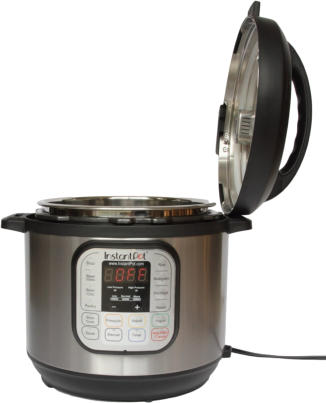


Top