|
Timeline Tools for
Sony Vegas Pro.
The
following Users Guide describes all of the features found
in the Timeline Tools Utility program.
Timeline Tools is a utility that, for the most part,
works with Open Vegas Projects. If a project
isn't Open, or you are working with Media
but have not yet saved it to a Project, most of the
programs features are disabled. This is also the
case while Vegas is opening up a large Project.
Once loaded, all the features are enabled and the Main
Event Display Grid will
be filled with information about Events on the
selected Track. Briefly, Timeline Tools
is a Vegas Command Extension like
Excalibur,
Vegasaur
and
Ultimate S,
and makes a great
adjunct to the features provided by these other
commercial applications. You
start Timeline Tools in the same manner as the others and dock its window in the same
spaces occupied by other built-in Vegas windows such as
the Project Explorer and Project Media windows.
Timeline Tools displays information about your Vegas Project and lets you manipulate Events,
Markers, Regions, Points, and FX & Transition PlugIns.
With Timeline Tools you can:
- Move one or more Events
around on the Timeline while maintaining their
Overlap & Fade settings in the new location.
- Reverse the positions of
a selected group of Events on the Timeline.
- Setup an AutoSave action that saves a running
series of your Project .Veg files.
- Add Tags to Media and Comments to
Events.
- Configure external Media editing tools
- Search for
timeline Media using several different search criteria..
- Filter the Event grid display
using several filter criteria.
- Look for multiple references to the same Media
file.
- Display Events in the Timeline that are missing
their associated Media files.
- Display only Generated
Media such as Text Events.
- Search for
Gaps in your Events based on a specified gap width.
- Automatically remove or add gaps
to targeted Events, and
remove or add overlap between adjacent Events. If you are
adding overlap, you can also specify the overlap fade
curve type.
- Remove or add Video FX PlugIns
and Transitions to one or more Events or Media files or
add Random transitions to Events.
- Remove Pan / Crop,
Rotation and Aspect Ratio, among many other settings to
a group of
targeted Events.
- Automatically add Markers
to your Events, and export and import your Marker positions
to and from a text file.
- Adjust the value of one or more Envelope Points with a
single mouse click. You can filter the list
of points to find specific points on the timeline.
- Get a quick
overview of all of the current project Event groupings.
- Save a set of
Project comments or
notes that are stored in a Rich Text Format file in your
Vegas Project subdirectory.
- All of the changes that Timeline Tools makes to
your Vegas project, are completely reversible using the built-in
Sony Vegas Undo feature.
- Perform Optical Scene detection
on Event Media.
- Perform Beat Detection Analysis
on an Audio Event and generate Markers at the sound
beats.
- Timeline Tools does all this and
more.
Timeline Tools behaves the same as other
Vegas Command Extensions. If Timeline Tools
is running when Sony Vegas Pro is closed down, it will
automatically load and position itself on screen when
Vegas is next started. If it isn't running
when Vegas is closed, it will not automatically load
when Vegas is next started. Most of the Timeline Tools features
operate on selected Events or items that are highlighted
in the Track Event Table or in List and Combo boxes that appear in
the programs different tabbed pages. Menu
items, checkboxes, and action buttons will clearly state if the
action will be performed on either Selected Events or
Highlighted grid items.
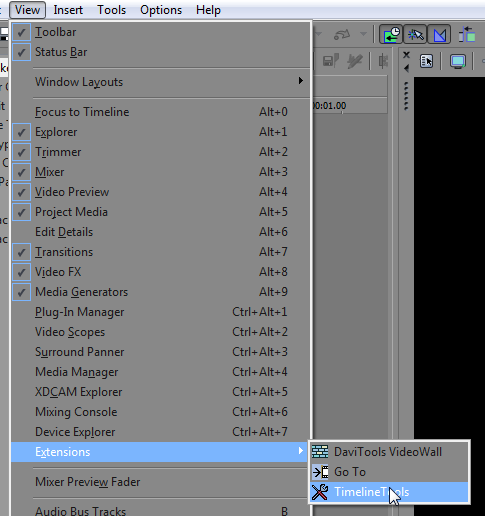
After downloading and installing the Timeline Tools
Vegas Pro Extension, you start the utility from the
Vegas Pro View Menu.
To start the program select:
View /
Extensions / Timeline Tools.
To make it easier to run
the utility in the future, you can add the Timeline
Tools icon to the Vegas Pro toolbar.
From the Vegas toolbar select: Options / Customize
Toolbar...

This brings up the
Customize Toolbar form. Scroll down the list
at left of Available toolbar buttons until you see
Timeline
Tools; then select it. Select an entry in the
Current
toolbar buttons list at the right, then press the Add
-> button. This installs the Timeline
Tools icon on the toolbar just ahead of the item you
selected in the list at right.
Note: you may have
to restart Vegas Pro after installing the Toolbar Icon
for it to become visible. |
|
|
Use
the following links to jump to the Tab of
interest.
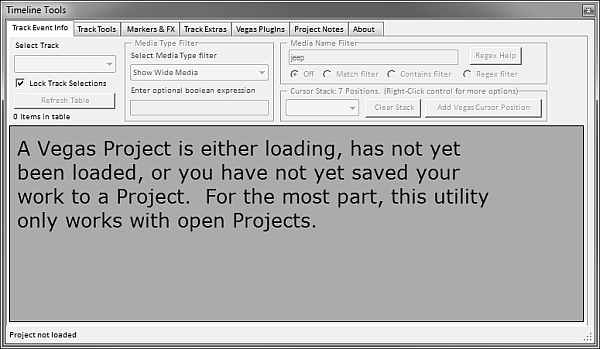
Timeline Tools is
primary designed to work with open Vegas Projects.
If you start up Timeline Tools without a Vegas Project
currently loaded, the main window will display the
message shown below. After that, if you
either Open up a project, or Save the current Vegas
configuration to a project, Timeline Tools will
automatically switch to its normal project display mode.
When you start the Extension from
within Sony Vegas Pro, the
Track Event Info tab is selected by default.
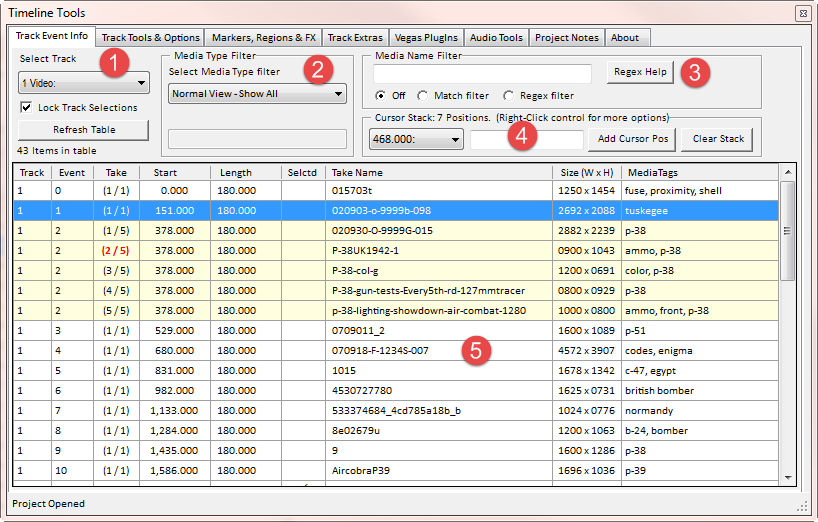
The
Track Event Info
tab (Fig. 1) consists of 5 separate sections.
Note: Some keystrokes used by Timeline Tools are the same as
those used by Sony Vegas Pro. For example,
the Spacebar is used in Sony Vegas Pro to Play/Pause
video Playback. In Timeline Tools, it toggles the
Vegas cursor position between the current and last
timeline position. The logic that determines which
application processes keystrokes is simple.
If you click your mouse anywhere in the Vegas
application itself (giving it focus), then Sony Vegas
will handle all subsequent keystrokes. If
you give focus to Timeline Tools by clicking on the main
Event grid, Timeline Tools will process the shared
keystrokes.
Section
(1) is where the Track of interest
is selected. If your project contains more
than one Video Track, an All Video Tracks
selection becomes available. This is also true for
Audio Tracks. Once a Track is
selected, the display Table fills up with information
about all the Events on the selected Track(s).
You can press the Refresh Table button to update
the Table should anything change in the Vegas Project
that did not cause the Table to be updated
automatically. This
section also includes a checkbox that can lock all of the
programs other Track selection controls to follow the Track
selected in the Track Event Info Tab. Note:
some Track selection controls only allow a Video Track
selection. If an Audio Track is selected in
Section 1, the other controls remain unchanged.
Also, changing the selected Track will reset any Events
stored in the Move list. Move operations are only
available when a single Track is selected.
If an All Tracks option is selected, you
will
not be able to perform a Move or Reverse Move operation.

If you hover the Mouse over the label that shows the
number of items in the grid, a pop-up appears that
displays the Combined Time Length of all items shown in
the grid. Note: this displays the
combined length of each Event shown in the list.
It does not display the length of time the Events may
occupy in the Vegas timeline; which could be different
due to overlap and gaps between Events.
Section
(2) The drop-down list
allows you to filter the list of Events by
Media Type. You can select from the following
filter types:
| Normal
View - Show All |
Displays All Events are included
in the table. |
| Show duplicate Media
Name refs. |
Displays Media files with the
same name, but from different file locations. |
| Show duplicate Media path
refs. |
Displays Media files that
appear in the project more than once.
This happens if an Event is split, or added
multiple times. |
| Show Missing Media Events |
Displays
Events associated with Media files that are
no longer present in their previous location. |
| Show misnamed Takes and Media |
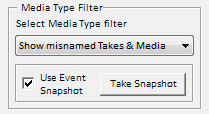 |
This filter selection will find Events that have been
unknowingly modified by the notorious Sony Vegas
Changed Media bug. When the Show
misnamed Takes & Media filter is selected, you
can select one of two ways that Timeline Tools
can use to check for the Vegas Changed Media
Bug. Leaving Use Event Snapshot
un-checked, will display Events where (1) The Take
name is not the same as the Media File Name; (2)
The Generated Media Name and Media Path are not
the same; or (3) The video or picture Media
Stream in the Take is reported by Vegas to have
a 0 x 0 image size. If you enable the Use Event Snapshot feature, both the
previously described tests, and a more thorough
analysis is performed to determine if your
Project media was corrupted.
This method employs a snapshot of all of your
Projects Media.
Press the Take Snapshot button to save
your current Project Media configuration.
If any changes occur between the Project Takes and
those stored in the Snapshot, the
effected Events will be displayed in the Main
Display Table.
Note: If you make any changes to your Project
such as adding or removing Tracks, Events, or
Takes, you must take another snapshot after
those changes have been made. |
| Show Events with Multiple
Takes |
Displays Events that contain two
or more Takes. |
| Show Generated Media |
Displays Events containing Media
such as Vegas Text, Test Patterns, etc. |
| Show Selected Media |
Displays
Events that are selected on the timeline. |
| Show Locked Media |
Displays
Events that have their Lock property set. |
| Show
Media with Plug-Ins |
Displays
Events that have a Video effect applied
(i.e. Transitions or Video Effects). |
| Show
Wide Media |
Displays
Events with Media having a greater width
than height. See below for
information on additional parameters. |
| Show
Narrow Media |
Displays
Events with Media having a greater height
than width. See below for
information on additional parameters. |
| Show
Square Media |
Displays
Events with Media having the same width
and height. See below for
information on additional parameters. |
| Show
Small Media |
Displays
Events with Media having both a width and
height, that is smaller than the project width
and height. See below for
information on additional parameters. |
| Show
Media that Fits |
Displays
Events with Media having just one
dimension (width or height) that is equal to or
smaller than the same project dimension.
See below for information on additional
parameters. |
| Show
Large Media |
Displays
Events with Media having both a width and
height, that are larger than the project width
and height. See below for
information on additional parameters. |
| Filter
by Size Expression |
Filter displayed Events solely by size
expression parsing. See below for
information on additional parameters. |
| Filter
by Media Tags |
When this
option is first selected, the Media Tag input box is blank.
This effectively perform a search for all Media that
has no Tags assigned. If
you enter "*" in the search field, this will display all
Events that have any associated Tag. Enter the
media tag you want to use to filter the main display.
As you enter the tag name, a drop down suggestion list
of possible valid tags appears. The more
letters of the tag name you enter, the more refined the
list of suggested tags becomes. Tags are
case-insensitive. To provide additional
filtering, you can enter more than one tag.
Multiple tags must be separated by commas. Note:
Tag name suggestions are only are available for
the first tag entered. The "*" and "?"
are wildcard characters that can match any
number of characters "*", or a single
character "?". If you place a
Tag inside of square brackets, "[" and "]",
this will exclude that Media Tag from the search
results. If you place the special
search Tag "[*]"
after all your other search Tags, only Media
with just the specified search Tags will be
included For example:
- "beach, sunset" matches any Media
containing both of the Tags "beach" and
"sunset". Any other Tags
assigned to the Media are ignored and will not
affect the search.
- "*ing" matches any Media with
a Tag that ends with
"ing" such as "surfing",
"following", or "running".
Other Tags are ignored.
- To search for Media with a Tag that has
"ship" anywhere in it, you would enter
"*ship*". This would match
"warship", "worships", etc.
- "ca?s" matches any Media with
a Tag that starts with
"ca", followed by any character, and ends
with "s". So "ca?s" would match
Tags
like "cars" and "caps".
Other Tags are ignored.
- "bar, [pool]" matches any Media that
contains the Tag "bar", and does
NOT
also contain the Tag "pool".
Other Tags are ignored.
- "beach, sunset, [*]" matches Media with just the two Tags "beach" and
"sunset" assigned to it. If
additional Media Tags are present, that
Media will be excluded from the search.
- "beach, [sunset], [*]" matches Media with just the two Tags "beach" and
any other Tag except "sunset" assigned to it. If
additional Media Tags are present, that
Media will be excluded from the search.
|
| Filter
by Event Comments |
Filter displayed events by matching
Event Comment. The "*" and "?"
characters are wildcards. "*"
matches any number of characters. "?"
matches any single character. |
Additional Parameters for the
Filter Types shown in the above table colored
Blue.
Show Media with Plug-Ins.
If this Filter is selected, an optional search string
can be entered into the parameter input box below the
drop down filter list. The search string is
not case sensitive, and returns a match
for any Plug-In listed in the Plug-Ins grid column that
contains the search string. For example:
entering color as the search string will
return a match for any event that has either the Sony
Color Curves, or the Sony Color Color Balance video
Plug-In applied. You can also enter
the wildcard characters "*" or "?" to
match PlugIns.
Show Wide Media, Show Narrow
Media, Show Square Media, Show Small Media,
Filter
by Size Expression.
If any of these Filters are selected, an optional
Boolean expression can be entered into the parameter
input box. The expression will be
applied against each Event, and if the result is true,
the Event will be displayed in the grid. The
optional expression recognizes the following Operators
and Constants:
- Math operators: * / + -
= < > != ( )
- Boolean operators: And, Or, Not
- Constants: Width, Height, ProjWidth,
ProjHeight, ProjAspect, PixelAspect.
Constants that are available for use in boolean
expressions are not case sensitive, and are
described as follows:
| Width |
The Width of the media in pixels associated with an
Event. |
| Height |
The Height of the media in pixels associated with an
Event. |
| ProjWidth |
The Width of the Project in pixels as determined by
the Vegas File / Properties Video Width
setting. |
| ProjHeight |
The Height of the Project in pixels as determined by
the Vegas File / Properties Video Height
setting. |
| PixelAspect |
The Pixel Aspect Ratio as defined by the
Vegas Project settings. |
| ProjAspect |
The Project Aspect Ratio defined as (ProjWidth
/ ProjHeight) * PixelAspect |
The following examples show how to use Size
Expressions to perform display filtering:
- Selecting Filter by Size Expression and
entering the expression: "(width > 1600)" will
filter the display to
only show Events that contain Media with a width
greater than 1600 pixels.
- Selecting the Show Wide Media filter and
entering the following expression: "(width <
projwidth) and (height < projheight)" displays
Wide Media that is also Small Media.
- Selecting Filter by Size Expression and
entering "not (width = 1600)" displays all Events
whose width is not equal to 1600 pixels.
This could also be achieved with the expression (width != 1600).
Section
(3) allows you to further
refine your display filtering by letting you specify search text for the Media Name in each Event.
All filtering is case insensitive. You can choose
to either turn this option Off; Specify a Match
using wildcard characters "*" or "?"; Or use Regular Expression (RegEx)
pattern matching. If you select a Match filter,
this
means the Media Name is exactly the same as the filter text
unless a wildcard characters are also used. Regular Expression searches are beyond the scope of this
user guide. But there are a few web sites that
cover the topic fairly well. Here are three sites
that do a good job of explaining Regular Expressions:
A,
B,
C.
Section
(4) allows you save any
number of Labeled Vegas Cursor positions to a stack in
the utility. Many people use Markers for
this. But using Markers to save cursor locations
can become unwieldy when the Project itself requires the
use of many Markers. The Cursor Position
stack can be viewed in a drop down list, and you can
move directly to any position in the list. You can save the current Vegas Cursor location to the stack by
pressing the Add Cursor Pos
button, or delete all of the entries in the stack by
pressing the Clear Stack button.
*Note - The Cursor Stack does NOT save selected Track
or Event information. Items in the stack are
simply timeline locations in your project.
When you press the Add Cursor Pos button, the
label in the cursor position text box will be associated
with that timeline position. This is useful
if you want to annotate locations in the timeline.
|

Cursor Stack |
Right-Click on the Cursor
Stack Drop-down list for a context menu describing other
options for the Cursor Stack (shown below).
|
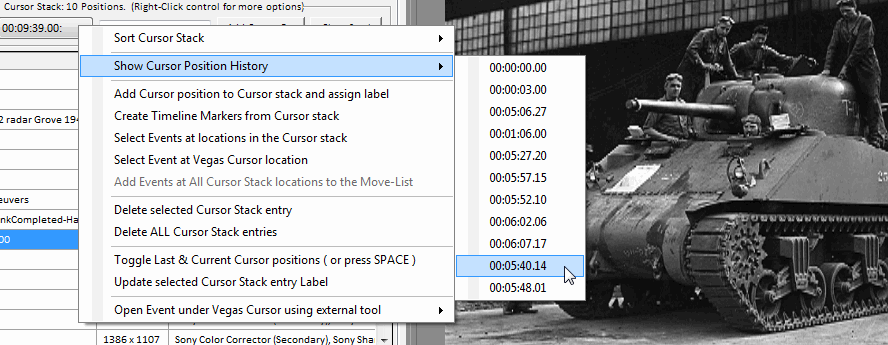
Cursor Stack Context Menu |
- Sort Cursor Stack - This rearranges the Timeline
positions in the stack so they can appear sorted as
earliest to latest, or latest to earliest.
- Show Cursor Position History - The maintains the
last 15 timeline locations where you either clicked
on an Event in the Timeline, or selected an Event in
the main display grid. As you move the
mouse through the list of locations, the preview
window displays the project output video at that
position in the timeline. You can select
an entry to keep the Vegas cursor at the new
position, or if you close the menu without selecting
anything the Vegas cursor returns to where it was
when you opened the Cursor History menu.
- Add Vegas Cursor position to Cursor stack - This
does the same thing as the Add Vegas
Cursor Position button.
- Create Timeline Markers from Cursor stack - This
will place a Vegas Marker on the timeline at each
location stored in the Cursor Stack.
- Select Events at locations in the Cursor stack -
This will Select all timeline Events that are at the
locations stored in the Cursor stack.
- Select Event at Vegas Cursor location - This
lets you select the Event under the Vegas Cursor.
Use this to select the Event that was just brought
into view by choosing a Cursor Stack or Cursor
History entry. Or any Event on the Vegas
Timeline.
- Add Events at ALL Cursor Stack locations to the
Move-List - This adds all of the Events at the
locations in the Cursor stack to the Move-List.
This is handy if you want to move many
non-contiguous Events at once.
- Delete Selected Cursor Stack entry - Deletes the
item in the Cursor stack is currently
highlighted.
- Delete ALL Cursor Stack entries - This is like
the Clear Stack button. It deletes ALL
items in the Cursor Stack.
- Toggle Last & Current Cursor positions (or press
SPACE) - Refer to Fig. 2 explanation of this
function below.
- Update selected Cursor Stack entry Label -
Select the Cursor Stack entry that contains the
label you want to change. Type in the
new label text. Lastly, select this menu
item.
- Open Event under Vegas Cursor using external
tool - Refer to Fig. 2 explanation of this function
below in the section titled:
Open selected Event
using external tool.
Section
(5) contains the Track Event
Table. The Table shows information about Events in the Track(s) selected in Section
(1). The action
taken when an item in the Table is selected, is
determined by the Timeline Tools Option settings found
in the Track Tools tab. If the
"Vegas Cursor tracks the selected Event table item."
option is enabled (the default setting), selecting an
item in the Table automatically positions the Vegas Cursor to that Event. If the
"Tracking
positions Vegas Cursor
to center of Event." option is enabled
(the default setting), the Vegas Cursor is positioned to
the center of the Event, rather than the start of the
Event. This is useful if
your Events are overlapped and you want to view the
Event in the Preview window. Right-Click on
the Table for a context menu of additional Event Table
features. If you are displaying the
PlugIns column, you will see Video Event PlugIns listed
when a Video Track is selected, and Audio
PlugIns if you have an Audio Track selected.
Video PlugIns that have "(Ts)" after them are
Transitions that are assigned to the Start of an Event.
Video PlugIns that have "(Te)" after them are
Transitions that are assigned to the End of an Event.
Note: PlugIns added to Active Take Media instead
of the Event itself, will be displayed in the color Red
in the grid. Because the grid cell text
color can only be a single color, Transition PlugIns
will also appear Red even though they are attached to
Events, not Media. Also, Video FX applied to
Media will have priority being displayed in the grid
over Video FX applied to an Event if both exist at the
same time.
At the bottom of the screen is the status message
line. This line contains information about
the current state of the program. It displays
information about tasks being performed, and any error
messages that may result. [Top]
[Tab Index] |
|
|
The
Track Event Info
tab
Right-Click context menu for
the Track Event Table
(or Grid) (Fig. 2).Note: Several
items in the Event
Grid Context Menu operate on either Highlighted Event
items in the Table,
or Selected Events. Highlighted Event items refer
to Events displayed in the Event Grid that are
Highlighted in blue. The grid allows you to
Highlight one or more Events. Selected
Events are those Events that are Selected in the Sony
Vegas Timeline, and are identified in the Event Grid
with a checkmark in the Selected Column.
Note: Some menu items will be hidden from view if they
are unavailable based on current other selections or
conditions.
In the following screen shot we can see Three
Selected Events, and One Highlighted Event.
Event Grid Context Menu:
(Move mouse over items shown in menu for
links to item descriptions)
To enable this menu view you must
disable the Vegas Cursor tracks the selected
Event table item menu item, and add some
items to the Move list [this is hidden in the online
view].
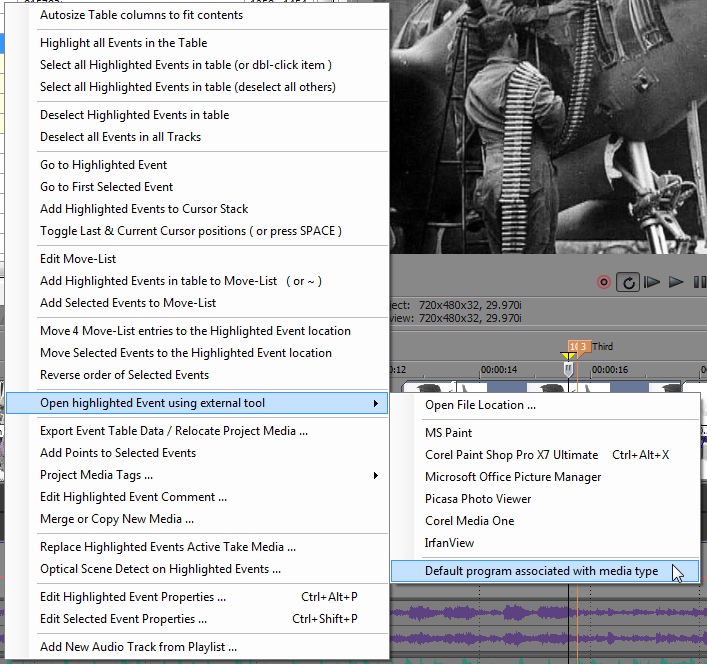 |
|
Figure 2 |
Autosize Table columns to fit
contents. This automatically sizes the
Table column widths for a better view of the contents.
You can also manually change the
individual column widths by placing the cursor on the
column separator in the column header, then drag
the line left or right. Any changes
you make to the column width settings will be maintained
and restored the next time you start Timeline Tools.
---
Highlight all Events in the
Table. This selects all of the Table
entries. The next two menu options work with
items highlighted in the Table.
Select all highlighted Events
in table (or dbl-click item ). This Selects
the Events represented by the highlighted
table items. Other Selected Events are unchanged.
You can also Dbl-Click an item in the Table to toggle
the Event Selection state.
Select all highlighted Events
in table (deselect all others ). This Selects
the Events represented by the highlighted table items.
All other Events are deselected.
---
Deselect Events highlighted
in table. Deselects the Events
represented by the highlighted table items.
Deselect all Events in the
Track. Causes the Selected state of all
Events in the Selected Track to be cleared.
---
Go to highlighted Event.
This is the manual method of doing what happens
automatically if the "Vegas Cursor tracks
the selected Event table item." option is enabled.
This menu item is hidden if the Cursor Tracking option
is enabled.
Go to First Selected Event.
Brings the first selected Event into view in the
Timeline Tools main display grid.
Add Highlighted
Events to Cursor Stack. Adds the
starting position of the Events represented by the
highlighted table items, to the Cursor Stack.
Toggle Last &
Current Cursor positions (or press SPACE ).
This is a very handy feature that lets the user
temporarily move the Vegas Cursor to a new position, and by
pressing the SPACE BAR, it will return to its previous
location. To use this feature do the
following:
- Have Timeline
Tools opened up.
- Click directly on
an Event in the Vegas Timeline so it gets selected.
- Then Click
directly on another Event in the Vegas Timeline so
it gets selected.
- Then Click on the last
selected Event entry in the Timeline Tools Event
Grid.
- Then either press
the SPACE BAR, or select the menu option to toggle
the Cursor locations.
- Clicking on
another Event in the Timeline makes this position
the newest position. Repeat the above process
to toggle between the last two Events.
Note: Vegas has a
limitation. Only when you click on an Event,
will Vegas inform Add-Ins and Extensions like Timeline Tools, that the
Vegas cursor has been moved. If you click on a Gap
between Events, Timeline Tools is not informed of the move,
and can't track the change.
---
Edit Move-List. The Move-List provides
an alternate method of selecting one or more Events that you
want to move around on the Timeline. This is
useful when you need to move several Events that are
widely spaced in a Project containing hundreds or more
Events. The Edit Move-List menu
selection brings up the following form. From
here you can view and alter the contents of the Move-List.
Right-click on the grid to bring up the context menu
where you can Autosize the columns to fit the contents.
(Not visible if there are no items currently in the Move
List, or an All Tracks selection was made)
(Press Ctrl-F1, or press Help to bring up the Users
Guide Page for this Form)
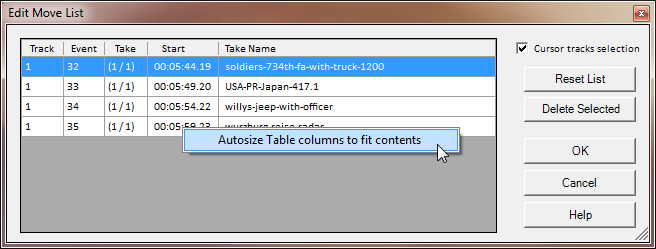
The Edit Move-List form gives you the ability to:
- Remove ALL entries from the list.
- Remove selected entries from the list.
In addition to the above, if you have the Cursor tracks
selection checkbox checked, as you move through the
Event list the Vegas Cursor will follow. This
allows you to preview the Events that have been added to
the Move-List. Any changes you make to the
Move-List will be accepted if you close the form by
pressing the OK button. If you press Cancel,
your changes are discarded and the Move-List remains
unchanged. When the Move-List form is
closed, the Vegas cursor will be restored to the
position it was at when the Move List form was opened.
Add highlighted Events in
table to Move-List ( or ~ ). This
menu item adds all of the
currently highlighted Events in the Events table to the
Move-List. You can also press the Tilde Key
(~) to add the
highlighted Events to the Move-List. (This menu
items is not visible
if an All Tracks selection was made)
Add selected Events to
Move-List. This adds the currently selected Events
in the Vegas Timeline to the Move-List. (This
menu item is not
visible if an All Tracks selection was made)
Move x List entries to
the Highlighted Event location. This
moves all Events that were added to the Move-List,
to the position in the Vegas timeline represented by the currently highlighted
Event table item. After Moving the
Events the Move-List is automatically cleared.
(Not visible if there are no items currently in the Move
List, or an All Tracks selection was made) To move Events using the Move-List, perform the
following steps:
- Choose the Event(s) that
you want to move by Highlighting them in the
Timeline Tools Event Table, or by Selecting them on
the timeline. Right-Click on the Event table and chose to add
either the Highlighted Events or the Selected Events
to the Move-List.
- Repeat the previous step as many times as needed
to select and add all of the Events you want to move
to the Move-List. These events can be
anywhere on the Timeline, but must all be from the
same track.
- Highlight a single Event in
Timeline Tools Event Table. This
Event location will be the insertion point where all the Selected
Event(s) will be moved. If you added more than one Event
to the Move-List, these Events will be moved
and be placed consecutively at the insertion
position.
- Right-click the Event table and select the
Move x List entries
to the Highlighted Event location menu item.
- Moved Events will maintain their
Overlap and Envelope Fade Type settings when moved.
Also, Events on a different Track that are
grouped with a moved Event, will also be moved (e.g.
an Audio Track will be moved with its grouped
Video Track).
Note: ALL Event Move operations are only
available when a specific Track is selected in the Track
Event Info Tab.
Cross track moves are not supported in Timeline Tools.
This must be done manually from the Vegas timeline.
---
Move Selected Events to the
Highlighted Event location. This is
another method than can be used
to move one or more selected Events from their original location
to another location in the Timeline. (This
menu item is not
visible if an All Tracks selection was made) To use
this feature do the following.
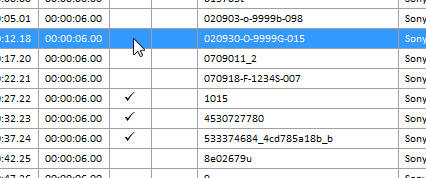 |
Three Events are selected and ready to be moved
ahead of the Event
named 020930-0-9999G-015 |
- Select the Event(s) on the
same track that
you want to move, either by selecting them from the
Vegas Timeline, or by Highlighting them in the
Timeline Tools Event Table and clicking the Select all highlighted Events
in table (deselect all others ) menu option.
- Highlight an Event in the
Timeline Tools Event Table. This
will be the insertion point where the Selected
Event(s) will be moved. If you Selected
more than one Event, these Events will be moved
and be placed consecutively at the insertion
position.
- Click on the Move
Selected Events to the Highlighted Event location
menu item.
- Events will maintain their
Overlap and Envelope Fade Type settings when moved.
Also, Events on a different Track that are
grouped with a moved Event, will also be moved (e.g.
an Audio Track will be moved with its grouped
Video Track).
Note: If you have A/V clips that have
Audio Events grouped with the Video Events, the
Audio Events will be moved along with the Video
Events. There's no need to perform a
separate Move operation on the Audio Events.
The same is true for moving Events with the Move
List, or the Reverse Events menu selection.
 |
The Events after the Move operation.
Note: This can be
reversed
using the Vegas "Undo" feature. |
Note: Move operations are only
available when a specific Track is selected.
Timeline Tools can not move Events between Tracks.
You must do that manually from the Vegas Timeline.
Reverse order of Selected
Events. This is used to Reverse the
order of Events as they appear in the Vegas Timeline. (This
menu item is not
visible if an All Tracks selection was made)
For example, if you have 10 Events in the Vegas
Timeline, and you Select Event numbers [2], [4], [7],
and [10]. After invoking this option, the
Events will be ordered like this: [1] [10] [3] [7]
[5] [6] [4] [8] [9] [2]. If you
Selected Events [8], [9] and [10]; after invoking this
option they would be ordered: [1] [2] [3] [4] [5] [6]
[7] [10] [9] [8]. To use this feature do the
following:
- Select the Event(s) that
you want to reorder, either by selecting them from
the Vegas Timeline, or by Highlighting them in the
Timeline Tools Event Table and clicking the Select all highlighted Events
in table (deselect all others ) menu option.
- Click on the Reverse
order of Selected Events menu item.
- Events will maintain their
Overlap and Envelope Fade Type settings when moved.
Also, any Events on a different Track that are
grouped with a moved Event, will also be moved.
Note: Reverse operations are only
available when a specific Track is selected.
---
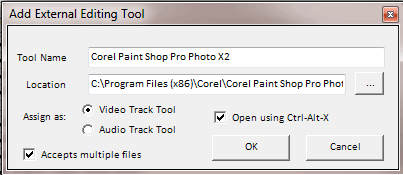
Open highlighted Event
using external tool. This allows you to
open up an Event's associated Media File with an external
Media editing program.
This could be either the default program associated with
the Media file extension type, or by selecting an external editing
program that you previously configured in the
Track Tools
tab. You can also choose to open up
the Media File Location in Windows Explorer.
Note: You will see different Media editors appear in the
list depending on the type of Media selected.
Also, if you have more than one Event Highlighted in the
Grid, only those editors that have the Accepts
multiple files option switch enabled will be
visible.
---
Export Event Table Data
/ Relocate Project Media .... This option allows you
to export information displayed in the Event grid to
a text file. It can also generate a DOS
Batch file that can be used to move all of your active project
media to a new file location. When this menu option is
selected, a form appears that lets you choose options
for exporting Event data. Only Events
displayed in the table are exported. If you have
filtering applied to the Event Table, such as a Text
Search or Media Type filtering, only the filtered
results can be exported. To export ALL table
data, remove all filtering that would reduce the number of
Events displayed in the table.
(Press Ctrl-F1 to bring up the Users
Guide Page for this Form)
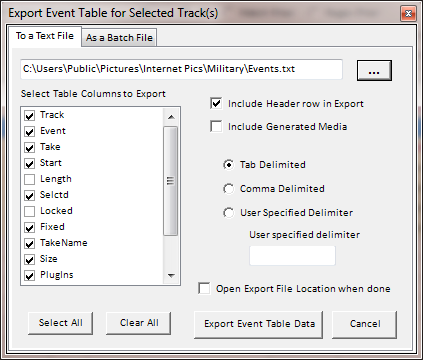
From this form you can select:
- Which Event Table columns
you want to include in the export (including those
that may not currently be visible in the main Event
table).
- Whether or not to include a
column header row at the beginning of the text file.
- Whether or not to include
information about Sony Generated Media such as Text,
etc.
- The character to use as a column delimiter.
- The location and file name where you want to
export the data.
- To open the Folder containing the exported text
file.
Press the Export Event Table Data button when you
have made all your option selections.
To create a DOS Batch file that can move your media
files, perform the following steps:
- Make sure all of the media files you want to
move are included in the Events displayed in the
main Event table.
- Select the menu option to Export Event Table
Data.
- Select the As a Batch File Tab at the top
of the form.
- Enter the location and name of the Batch file
that will be created.
- Enter the location where you want to move your
Project Media files.
- Choose if you want to create a Batch File that
warns about potential file over-writes. This
can prevent the loss of your media files if your
project contains multiple media sources from
different locations that all have the same name.
Moving all of these files into the same location
would cause file over-writes if this option is
omitted.
(Press Ctrl-F1 to bring up the Users
Guide Page for this Form)
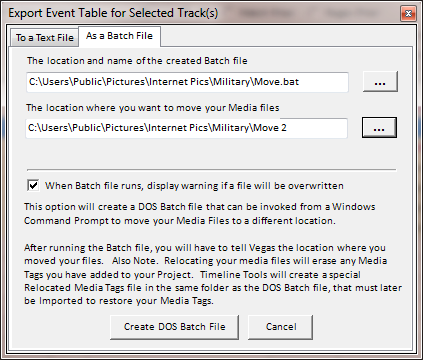
Press the Create DOS Batch File button when
you have made all your option selections.
Timeline Tools will skip over media files that are already located in the target
location. When finished, a Message box will
inform you of the results of the action. If
no errors were encountered, and a Batch file was created, after closing the Message box
Timeline Tools will open up Windows Explorer to the
location of the Batch File with the Batch File
automatically selected. If you double-click
the Batch File it will run and automatically move all of
the included media files. When you click
back on Sony Vegas Pro, you'll see a Message box warning
you about missing media files. Select the
option to specify a new location. When Vegas
opens up the file selection form, enter the name and new
location of the requested file then press OK.
Finally, tell Vegas to use this location for ALL missing
files.
Note: The above steps can only be performed if
you have the following Sony Vegas option selected.
This option tells Vegas to close all open media files
when Sony Vegas Pro is not the Active program (the
program with focus). Running the DOS
Batch file takes focus away from Vegas allowing the
Media files to be moved without causing a File In Use
error. The same is true if you use the
Timeline Tools feature to edit Project Media in an
external editor program.
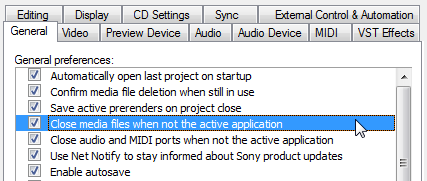 |
Sony Vegas Option that must be selected to use
an external Media Editor
program, or execute the batch file created to
move project media files. |
---
Add Points to Selected Events. This
option will automatically add four Points to the
selected Track Envelope and selected Target Track in
this dialog, based on the physical locations of the
Selected Events in the Track selected in the drop down
Track list in the Track Event Info Tab.
Points are added that
bracket the Selected Events. For
example, here's a typical use-case for this feature.
Let's say you are creating a photo slide show that will
have an accompanying sound track. Your
photos will only be visible on screen for a few seconds
while the longer audio track is played.
And for effect, you would like to drop the sound level
during photo transitions, or inter photo gaps.
This feature lets you select your photo video track in
the Track Events Info Tab; then select the photos that
you want to use to place your points on the accompanying
Audio Track. And finally select your Audio
Track in the dialog box and which envelope in the Audio
Track will receive the points when you click the dialogs
OK button.
Another use for this feature would be to add points
to the Video Bus Tracks Motion Blur envelope. This
can help reduce the herringbone interference effect when
some detailed images are Panned & Zoomed using Event
Keyframing.
(Press Ctrl-F1 to bring up the Users
Guide Page for this Form)
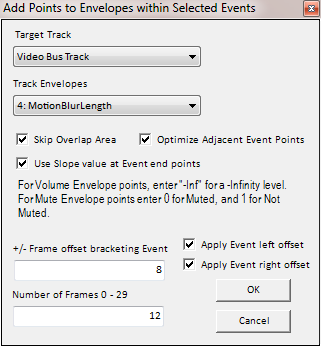
The option dialog contains the following settings:
- Target Track: This dropdown
list shows all of the Vegas Tracks that contain at least one
Envelope.
- Track Envelopes: This
dropdown list shows all of the Envelopes that are
available for the selected Track.
- Skip Overlap Area: If
checked, when Points are added to the selected
Envelope, the points will be located in the
non-overlapped section of the Selected Events.
Otherwise the points will be added at the start and
end of the Selected Events.
- Optimize Adjacent Event Points:
When the four Points are added to the Envelope,
there are two end points that bracket the Event, and
two inner points that set the envelope level for the
duration of the Event. Normally the
bracketing Points are set according to existing
values on the Envelope; based on either the value of
the last point before the new points, or on the
value of the Envelope slope at the position of the
new points. If this setting is enabled,
all other settings are ignored and the bracketing
points of adjacent Events are set to the same level
as the inner points.
- Use Slope value at Event end points:
This setting lets you select how the bracketing
point levels are determined. If
unchecked, the bracketing Points will be set to the
level of the last existing point that's present on
the Envelope before the start of the selected Event.
If checked. The bracketing Points will be set
to whatever the current value of the Envelope Slope
is at the location of the bracketing Points.
- Apply Event left offset: If
checked, the amount of offset in frames given in the
+/- Frame offset bracketing Event input box
is added to the left edge of the Event in deciding
where to place the Points on the Envelope.
- Apply Event right offset: If
checked, the amount of offset in frames given in the
+/- Frame offset bracketing Event input box
is subtracted from the right edge of the Event in
deciding where to place the Points on the Envelope.
- +/- Frame offset bracketing Event:
The number of frames to add to the left Event
bracketing point, and subtract from the right Event
bracketing point.
- [The Value input Box for the Selected
Envelope]: The
value of the Envelope that will be created by the
bracketing Points. The title of this input box
will change depending on the envelope type selected
in the dropdown. The value entered will
also be in units that are appropriate for the
selected envelope type.
The following example demonstrates how a Motion Blur can
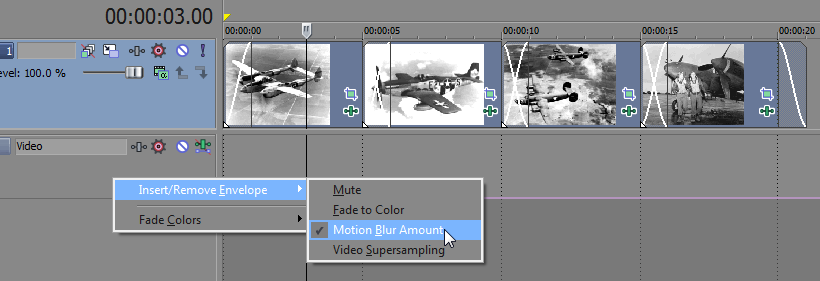
be assigned to Events on the project video track.
The project contains four graphic
images that have a one second overlap. The
video Track is selected in the Track Event Info Tab. Also, the
projects Video Bus Track has been made visible using the
Vegas View / Video Bus Track
(Ctrl-Shift-B) menu option. A Motion Blur Amount envelope has been added to the
Video Bus Track using the context menu shown below.
Static graphic images like those in the above project
would not normally require a Motion Blur effect.
But, if you will be adding Pan and/or Zoom Keyframes,
some images will produce a herringbone interference
effect if that image contains tightly grouped
patterns such as closely spaced lines, or small objects
with sharp edges. Pictures that contain grass, tree
bark, gravel, and clothing with small closely spaced
striped or checked patterns can all cause a herringbone
distortion effect while the image is transitioning from
Keyframe to Keyframe during a zoom.
The following image is a picture of a rug with a tight
weave. You can download this image to see
the effect. (1) Download the image.
(2) Add it to a project. (3) Set the image length
to 6 seconds. (4) Add a Keyframe to the end of the image that produces a zoom
effect. (5) Playback the image and you'll see the
distortion effect.
Low Resolution Images that contain the above
mentioned patterns are especially susceptible to the
effect. One way I've found to minimize
this zoom action distortion,
is to apply some Motion Blur. This was the
primary purpose of adding this feature to Timeline
Tools.
In the above project, select Event number two.
Right-click the Timeline Tools Event Grid and select the
Add Points to Selected Events
menu option. In the Add Points to
Envelopes within Selected Events form, make the
following selections:
- Select the Video Bus Track as the Target Track.
- Select the Motion Blur Length Envelope.
- Check the Skip Overlap Area checkbox.
- Uncheck the Optimize Adjacent Event Points
checkbox.
- Enter 0 in the +/- Frames offset
bracketing Event input box.
- Uncheck both the Apply Left and Apply Right
checkboxes.
- Enter a value of 10 into the Number of
Frames input box.
When done press OK.
 |
 |
| Events that are butted
end-to-end |
Events that are overlapped |
Four points were added to the Motion Blur
envelope that bracket the selected Event.
If you overlap your Events, the Skip Overlap Area
checkbox will place the points so they bracket just the
non-overlapped area of the Event. This
option is useful if you will be using transition effects
in the overlap area. Your rendered video
will suffer from undesirable side-effects if you perform
Motion Blur over a number of images that contain
both image frames and transition effect frames. This prevents the
transition effect frames from being included in the blur. You
can have finer control of this by using the +/- Frame
offset bracketing Event feature.
This allows you to specify additional Frames that you
want to reduce the bracketed Event area.
|
|
 |
| Overlapped Events
with Overlap area skipped, and bracket width
reduced by 7 frames. |
Close up view of the 7 frames
removed from the bracket. |
Above you can see the effect that the 7 frame
offset value had on the placement of the envelope
points. The width of the envelope bracket has been
reduced by 7 frames at each end. If
you will be using a large number of frames for your
Motion Blur, you will need to skip over additional
frames of video following the transition to insure that
transition frames are not averaged into your Motion
Blurred video.
---
Project Media Tags. This menu
option lets you select one of three Media Tag related
options: Edit Tags, Export Tags and
Import Tags.

Edit Tags brings up the project Media Tag Editor form.
Media tags are saved as Metadata in the Media objects
contained in the Project Media Pool. Media Tags
let you to assign labels to your Project Media that can be used to filter the list of
Events displayed in the Main Event grid.
Note: Media Tags entered in the editors input box
may not contain any of the following characters:
"[", "]", "?", or "*".
Note: The Media Tag feature supported by Timeline
Tools is completely independent from the Media Tags
provided in the Sony Media Manager. Media
Manager uses an SQL database that is common among all
Vegas projects. The Timeline Tools Media Tags are
unique to the Media in each project, and are stored in
the Project .VEG file.
(Press Ctrl-F1 to bring up the Users
Guide Page for this Form)

The Media Tag Editor form is modeless; meaning it can
be opened, and you can continue working with the
Timeline Tools utility windows. The Media
Tag Editor supports the following features.
- Add New Tags. Enter the Tag
in the input box and press Enter, or press the Add
Tag button. As you enter letters into the
input box you will see a list of Tags that already
have been created for your project. You can
select from the list, or continue to enter an
entirely new Tag.
- Update Tag. This lets
you edit a previously entered Tag.
Select the Tag from the list that you want to
change. Enter the replacement Tag in the input
box. Then press the Update Tag button.
- Delete Tag.
Select the Tag from the list that you want to
delete. Then press the Delete Tag button.
- Reset Tags. This
deletes all Tags from the Event.
- Close. This closes the
Media Tag Editor window.
Tags that are added to or deleted from the indicated
Event, are done so immediately. You do not
have to Apply them or Close the Editor window.
While the Media Tag Editor window is open, highlighting
new Events in the main display grid opens the Event in
the Media Tag Editor. This allows you
to quickly move from Event to Event to add new Tags.
Pressing the Up or Down Arrow key while focus is in the
Tag input field, moves the selected Event in the main
display grid up and down in the list.
Finally, you can right-click on the Tag list window
to bring up a context menu that lets you Copy and Paste
Tags from one Event to Another. This copies
either all of the tags, or selected tags from one event into another.
Export Tags lets you export the Tags assigned
to your Project Media in an XML file of your choosing.
Through this mechanism you have the ability to share
Media Tag information between Vegas Projects that
reference the same Media files.
Import Tags lets you open a Media Tag XML file
to restore or assign Tags to Media that's present in
your Projects Media Pool.
Timeline Tools takes advantage of the Sony Vegas
"CustomData" property on the Project, Event and Media
Stream objects to store Event Comments and Media Tags
displayed in the main grid as Metadata saved in the
Project .veg file. For you programmers, there are three GUIDs
used to access these pieces of metadata.
// Event Guid ID for Timeline Tools Event Comment
public Guid EventCommentGuid = new Guid (
"1A922985-3362-4F23-B834-170B8A856307" );
// Media Stream Guid ID for Timeline Tools Media Tags
public Guid TagGuid = new Guid (
"F19F027C-78D8-4E71-ADDD-3DFA00D9CF71" );
// Project Guid ID for Timeline Tools Media Tags
Imported flag. Value set to 0x01 if Tags were imported
from old Tag xml file.
public Guid TagsImported = new Guid (
"D2147916-C6FC-4102-8EB2-847AD68A4E98" );
The Imported flag Project GUID indicates if Media
Tags have been imported from the old style Tag XML file into the
CustomData property of the Media Stream assigned to an
Events Take. Use the following code snippet to get
the value of this flag. If true, then Media
Tags are available in the Media Stream's CustomData.
byte[] val = new byte[0];
bool bImported = false;
val = myVegas.Project.CustomData.GetBytes (
TagsImported );
bImported = ((val != null) && (val[0] == 0x01));
---
Edit Highlighted Event Comment ...
This option brings up the Event Comment dialog box.
From here you can Add, Remove or Edit the comment
associated with the Event that was highlighted in the
Main Display Grid. If more than one
row in the grid is highlighted, this menu item is not
visible.

---
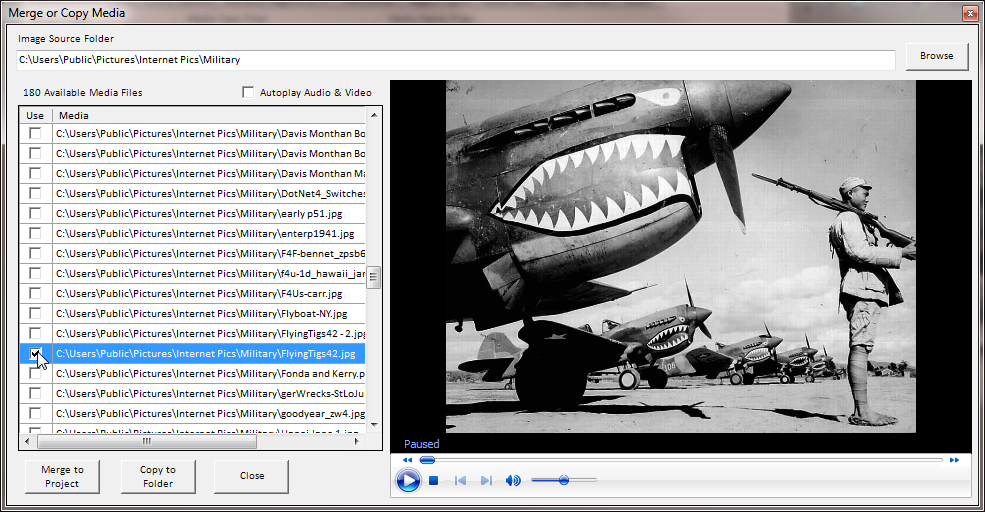
Merge or Copy New Media
... This menu item brings up the Merge or Copy Media
dialog box. This option allows you to easily
Select and Copy New Project Media from one folder to
another, or select New Project Media from a folder to be
Merged into your Project at the end of the Selected
Track in the upper left corner of the Track Event Info
Tab. When the dialog box is displayed a list of
Media files will be shown. Clicking on a file in
the list will preview the file in the Preview Window.
Image files will be displayed immediately, but Video or
Audio files will must be started by pressing the round
Play button in the Preview Window. If
the Autoplay Audio & Video option is checked,
then these types of files will automatically start
playing after being selected in the grid.
To Copy New Project Media from one Folder to another
Folder:
- Select the Merge or Copy New Media menu
item.
- The Merge or Copy Media dialog opens up
and is filled with a list of Media files found in
the Image Source Folder shown above the grid.
The Media files displayed in the grid are filtered
to not display any Media files that are already
being used in any Event in the Selected Track.
If this is the first time the Merge or Copy Media
dialog has been displayed since you started Timeline
Tools, the Image Source folder is initialized with
the path of the first Highlighted Event in the Main
Display Grid. Otherwise this is the last
folder chosen when the dialog was closed.
- If you'd like to select a new folder as the
source for Media files to be copied, pres the Browse
button above the preview window and choose a folder
location from the dialog.
- When you've selected the source folder for your
new Media files, the go through the list of Media
files in the display grid and check the files that
you want to include in your Project. The
Right-Click Context Menu lets you Autosize Table
Columns to fit contents of the display area that
adjusts all column widths to fit the largest item in
each column, or you can perform group
Check/Uncheck actions to make file selections
easier. You can Uncheck All which
unchecks all files, Check All which checks
all listed files, Uncheck Highlighted
which unchecks all Highlighted files, and Check
Highlighted which checks all Highlighted items.

- After you've Checked all the files you want to
Copy to a new folder, Press the Copy to Folder
button.
- The Browse For Folder dialog opens up again
where you select the folder where you want to copy
the Media files.
- Select the Copy to Media Target Folder from the
tree and press OK.
- Your checked Media files are copied from the
Source folder to the Target folder.
- At this time you could press the Merge to
Project button, and the files that were just
copied will be added to the end of the Selected
Track in your Project.
To Merge New Media files into your Project at the end
of the last Event in the Selected Track.
- Follow steps 1 through 4 in the instructions
above on how to Copy New Project Media from one
Folder to another Folder.
- After you've Checked all the files you want to
Merge into your Project, Press the Merge to
Project button.
- The checked files will be added beyond the last
Event in the Selected Track.
I should also mention that the display grid in the
Merge or Copy Media dialog box can also be used as a
Drag and Drop source for checked files.
If you choose, any files displayed in the grid that have
been checked, can be dragged out of the grid and dropped
into an appropriate type of Track in the Vegas Timeline.
Or they can be dragged out of the grid on dropped on a
folder in Windows Explorer. Dropping on an
Explorer folder causes the checked files to be copied to
that folder.
---
Replace Highlighted Events Active Take Media ...
This option allows you to select an alternate media file
that will replace the Active Take in the single Event
Highlighted in the grid. After choosing this
menu option you are prompted to select the replacement
media file from the file browsing dialog.
Navigate to the desired replacement media file, then
click OK. The selected media is then checked
for compatibility with the Highlighted Event.
After validation the media is added to the
Project media pool, if not already present; and then it is added to the Event Takes collection
as the active Take. The previously Active Take is removed from the
collection. Since this action only
works on a single Event, the menu option is hidden if
more than one Event is selected in the main display grid.
---
Optical Scene Detect on Highlighted Events ...
This menu item is not shown if anything other
than a single Video Track is selected in the Track
dropdown list. This feature of Timeline Tools allows you to
perform an Optical Scene Detection analysis on selected
Event(s) for the purpose of generating Vegas timeline Regions
that span scenes that are present in an Events Active Take
Media file. Vegas has a built-in
ability to detect scenes from Digital Video sources when
the video is Captured and imported into Vegas.
However, this feature isn't available when Capturing
video converted from Analog Recording sources, or after
the video has been imported into a project.
This feature of Timeline Tools provides that capability
for previously imported video regardless of its original
recording method. When
scene detection sensitivity has been properly adjusted
for any particular video file, Optical Scene Detection
can accurately detect scene changes within +/- One
Frame.
You access this feature by selecting the Timeline
Tools Track Event Info tab. First, select a
single Video Track from the dropdown Track list. Next,
Highlight the Event(s) that contain scenes you want to
detect. Then Right-Click on the Main Display
Grid and choose the Optical Scene Detect on
Highlighted Events menu item. This will
bring up the following form.
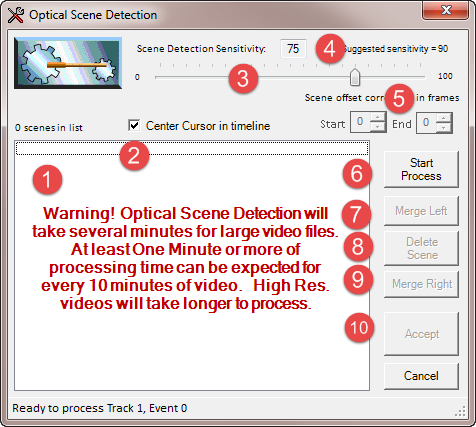
The Optical Scene Detection form contains several
different controls identified by the numbers shown in the Red
Circles. Here is a description
of each:
- This is where the list of detected Scenes will be
displayed after running the Scene Detection Process.
You can select either individual, or multiple items
in the list to be edited using the Merge and Delete controls
numbered 7 through 9. Note:
controls 7 and 9 (the Merge controls) are disabled
if you have multiple items selected.
- This is a checkbox that forces the Vegas
timeline cursor to be centered in the timeline. This can be very helpful
when you want to tweak the Start
and End frames of a scene to fall exactly on a scene change, or
to skip over bad frames that can be present in older
analog recorded videos that were transferred from
video tape. This will keep the scene
changes centered on screen as you move through the
scene list in item 1.
- This is the scene analyzers sensitivity slider
that adjusts through a range of 0 to 100; with 0
being the least sensitive, and 100 the most
sensitive. If you are seeing too
many scene changes being detected that are not true
scene changes, the decrease the sliders sensitivity.
Likewise, if the analyzer is missing scene changes,
increase the sensitivity.
- You can either use the slider to set the
sensitivity, or you can enter it directly in the
input field next to number 4. The
default sensitivity is set to 90. But you can
change this to meet the needs of your individual
video files. Once you are satisfied with the
scene detection sensitivity setting, when you press
the Accept button the current setting will be
saved and restored the next time you perform a scene
detection analysis.
- The Numeric Up / Down controls become
enabled after completing the scene detection process.
By selecting one or more scenes in the list,
these controls allow you to adjust the Start and End
timeline positions of the selected events by
applying a +/- frame offset value.
The scene analyzer has a precision of about +/- One
Frame. So in some cases you may have to adjust
the scene Regions Start or End position to correct
for this inherent inaccuracy.
- This is the button that Starts the Scene
Detection Process.
Hold Down the Shift Key to display Debug Log.
Hold Ctrl-X keys to abort FFMpeg operation.
- After Scenes have been detected, buttons 7, 8,
and 9 become enabled. These allow you to
edit the detected scenes. Button 7 lets
you merge the scene currently selected in the list,
with the previous scene immediately to its left.
The selected scene is deleted, and the previous
scene is increased in size to also occupy the space
previously taken up by the selected scene.
- Button 8 allows you to delete the scenes
selected in the list.
- Button 9 lets you merge the scene currently
selected in the list, with the next scene
immediately to its right. The selected
scene is deleted, and the next scene is increased in
size to also occupy the space previously taken up by
the selected scene.
- These are the Accept and Cancel buttons.
Press Accept button when you are satisfied with the
results of the Scene Detector and after you've made
any changes are edits to the Scene Regions.
If you press Cancel, all of the analyzers detected
scenes will be deleted from the Vegas timeline.
Here is a typical workflow suggestion for using this
feature.
- Open Timeline Tools and Select a Video Track in
the dropdown Track list, then Highlight an Event in the
main grid, right-click and select Optical Scene
Detect on Highlighted Events menu item.
- Press the Start Process button.
- Click on a scene in the list. Note:
If you click the same item multiple times, the Vegas
cursor will toggle back and forth between the Region
Start and End positions.
- Click on the selected Track in the Vegas
Timeline.
- Zoom out the Track view so the Region Boarders
can be easily identified and the Cursor can step
from frame to frame.
- Click the timeline to position the Vegas just
before the scene change.
- Step the cursor by frames till it crosses the
scene change.
- If the scene change looks good repeat these step
for the next scene in the list starting at step 3.
- If the scene needs to be edited, either drag the
end points of the Regions directly from the
timeline.
- Make the needed offset adjustments to the Start
and End points of the selected scene using the Up /
Down controls.
When all scenes have been modified, or accepted as is,
press the Accept button to retain the current
Regions and their settings.
The next step
may be to clip the Regions into their own Events. To
perform this task:
- Click on the Markers, Regions & FX tab.
- Select Regions Mode.
- Press the Select All button to the right
of the Regions list.
- Then click the Split Evnts @ Markers
button.
- You will be prompted to continue.
- If you did not have an associated Audio Track
selected in the Vegas timeline, you will be prompted
to also split the associated Audio Track if present.
- All of the Regions will be split and Grouped into new
Events.
The Optical Scene Detection feature in Timeline Tools
is made possible by leveraging off the Microsoft Windows
builds of an open source program called FFmpeg.
FFmpeg is a complete, cross-platform solution to record,
convert and stream audio and video. For more
information about FFmpeg please visit:
http://ffmpeg.org/. The
stand-alone 32 and 64 bit statically linked builds for Windows were
obtained from
http://ffmpeg.zeranoe.com. The 32
and 64 bit versions of these programs are installed
under the FFmpeg folder in the "Vegas Application
Extensions" directory. FFmpeg is
continuously being upgraded and maintained to fix
software bugs and add support for new video formats.
Newer releases of Timeline Tools will include the latest
release of FFmpeg. However, if needed,
you can visit the web site and download the latest
versions, and replace the versions of FFmpeg in the folders
described above.
Lastly, I'd like to give much deserved credit to
Andrei Craciun for his help in making this Timeline
Tools feature a reality. Andrei contacted me
with the original suggestion for incorporating this
feature into Timeline Tools, and continued on to provide
invaluable technical assistance and bug testing to making it
happen. Without his help this would not have
been possible.
--
Edit Highlighted Event Properties.
This option and the
Edit Selected Event Properties
option lets you to edit selected properties on one, or
more, Events simultaneously. This
option lets you edit Events that are are Highlighted in
the Main Display Grid. Select a Track(s),
then Highlight the specific Events in the grid that you want to
edit. Event property editing is
described in more detail in the
Edit Selected Event Properties
selection.
Edit Selected Event Properties.
This option lets you edit selected properties on one or
more Events simultaneously. First,
Select a Track(s). Then Select all of the
Events in the Vegas timeline of the Track that you want to edit.
Finally select this option to bring up the Event Property
Editor.
(Press Ctrl-F1 to bring up the Users
Guide Page for this Form)
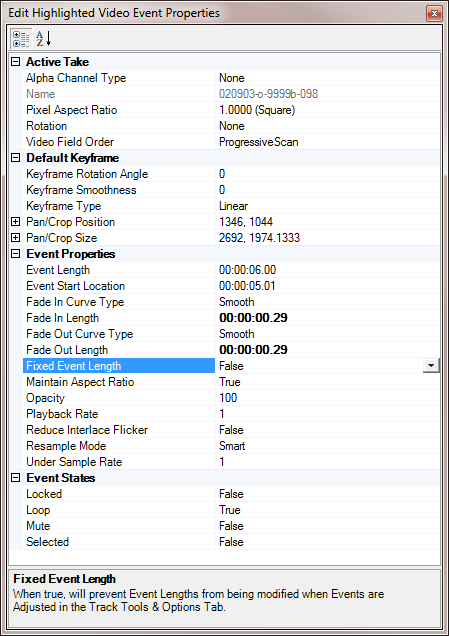
The Property Editor lets you directly change the
exposed properties of one or more Events.
Changes made in the Property editor are immediately
applied to the Event(s). There is no
"Cancel" operation. Note:
Because of the way Vegas updates it's Preview Window,
the effect of changing some properties will not be
displayed until after the Properties Editor is closed.
The property editor
displays Properties in Groups. In the
example shown above, properties such as Locked, Loop,
Mute and Selected are in the Group called Event States.
Default values of Properties are shown
in Regular text. If a property has been
changed from its default value, it's shown in Bold.
If you've selected Multiple Events simultaneously,
properties that are not all set to the same values, will
appear blank in the property editor. If you
then change the value of the blank entry, that specific
Property in all of the Selected Events, will be set to
that value, and will then become visible in the Property
Editor. The Properties that are
exposed in the Property Editor are a combination of
properties that exist on the Event itself, the
Active Take, and the Video Motion Default Keyframe.
These represent a set of what I've determined to be the
most common properties that people would like to access.
To use the editor, select the Property Type in the
left column. Then make the change in the
right column. Some properties present a
drop-down list. Some are free form entry.
Some, like Position and Size let you enter both values
at once, or let you expand the selection to change one
of the two values. Finally, the Pixel Aspect
Ratio property lets you select from a list of
pre-defined values. Or you can select the Custom
selection and a popup entry form appears where you can
enter your custom PAR.
Note: The above example shows the
Property Editor as it appears when a Video Event was
selected. Audio Events will expose a smaller
number of editable properties.
Add New Audio Track from Playlist ...
This option lets you Open a standard .M3U or
.WPL Windows Playlist file, and import the
Playlist audio files into a new Vegas Audio Track.
[Top] [Tab
Index] |
|
|
|
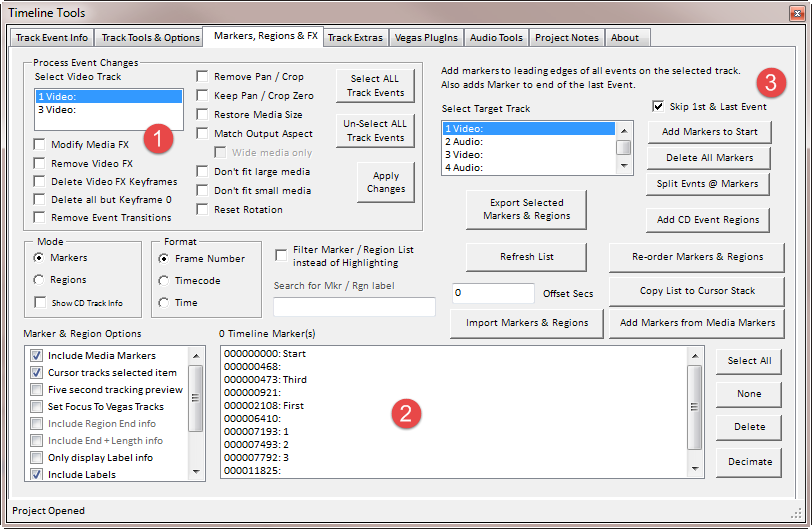
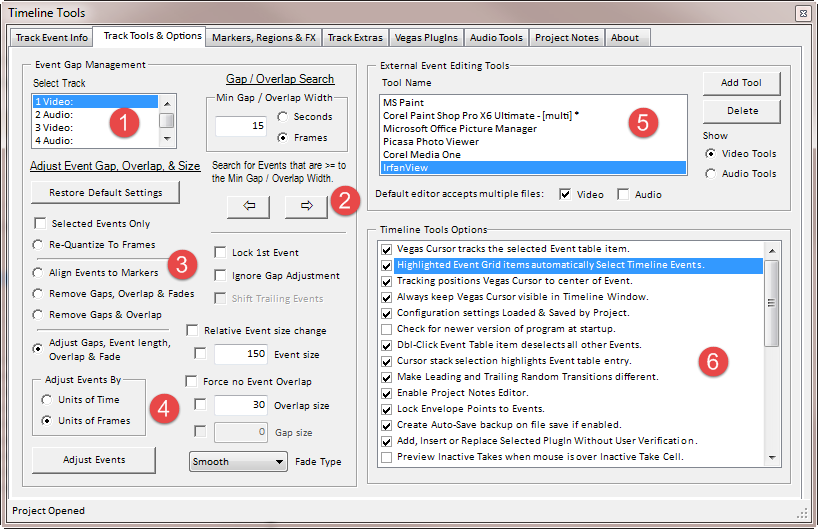
The Track Tools &
Options
tab (Fig. 3) consists of 6 separate sections.
Features on this tab allow you to adjust Event Size,
Gaps, Overlap, Fades and Fade Curve type.
You can also review and change program options, and
define one or more external editing programs that can be
called up to edit Event Media.
 |
|
Figure
3 |
|
 |
|
Figure
4 |
Section
(1) allows you to select
the Track where Event modifications will be applied.
If the Lock Track Selections checkbox in the Track Event Info Tab is checked, the Track selection
will automatically follow what has been selected in the
Track Event Info Tab. However,
this does not prevent you from changing the selection
manually.
Section
(2) lets you search the
selected Track for Gaps or Overlap between Events that are greater
than, or equal to the specified Min Gap / Overlap Width
value in
seconds.
A value of zero simply jumps the Vegas Cursor to the
next Event on the Track. A non-zero value
will move the Vegas Cursor to start of the next gap that
is greater than or equal to that value. A Negative
value will search for an Event Overlap amount that is greater
than or equal to the absolute value of the specified
time.
Section
(3) contains the Restore
Default Settings button that quickly resets all of
the Section 3 and 4 controls to their default state.
This is useful if you'll be making several Selected
layout modifications; and you want to start each layout
from a default state. Section 3
provides an action selection to Re-Quantize To Frames
which aligns all targeted Events to place the Event
Start and End locations at the closest rounded down
frame position. Section 3 also has an
option button to Align Events to Markers.
This will Size and Position all the targeted Events so
they are placed at the position of each Marker, and sized to fit
between the starting Marker and next Marker. This
feature also lets you add Gaps or Overlap to the aligned Events,
but the size of these options are limited to fit within
the available Marker length. Section 3 also contain two
action Presets;
Remove Gaps, Overlap & Fades and Remove
Gaps & Overlap that apply specific modifications to
the targeted Events in the selected
track. Along with the two Presets, there are
some additional checkbox options that modify how all
three of the Adjust Event Gap, Overlap & Size
radio button options behave. If the Selected Events Only
checkbox is checked, only the selected Events on the
Selected Track will be affected. If the Lock
1st Event checkbox is checked, the first eligible
Event on the Selected Track will not be moved; causing
all Events further down the timeline to be adjusted
relative to the first Event. An Event is
eligible if it's the first Event on the Track, or if the
Selected Events Only option is checked, and it's the
first Selected Event. If the Ignore Gap
Adjustment checkbox is checked, Event Gaps
will NOT be affected when any other editing
operation is performed that would alter or remove Gaps. If the
Selected Events Only
and Shift Trailing Events
checkboxes are both checked, Event modifications that
may cause a change in their position on the
timeline, will also shift all of the unselected trailing
Events Left or Right as needed. Note: The
Shift Trailing Events checkbox can only be selected if the
Selected Events Only
checkbox is also selected.
Remove Gaps, Overlap
& Fades. This Preset adjusts all targeted Events on
the selected Track and moves them adjacent to each other
without any leading Gaps. There will be no Event Overlap,
and any Event Fade In/Out settings will be cleared.
Remove Gaps &
Overlap. This adjusts all targeted Events on
the selected Track and moves them adjacent to each other
without any leading Gaps. There will be no Event Overlap,
and any Event Fade In/Out settings will be retained.
Section
(4) Adjust Gaps, Event length, Overlap & Fade. This is
the meat & potatoes option that gives you the most
flexibility in modifying your Track Events.
The best way to approach using the controls in this
section is to first understand that ALL the controls
will be examined, and depending on their combined
settings, they will individually either be used or
skipped when the Adjust Events button is pressed.
Together, these controls can Add / Remove Event Overlap,
Add / Remove Event Gaps, Size or Not Size Events,
Reposition or Not Reposition Events on the timeline, or
Add / Remove / Change Fade settings.
What is and isn't adjusted depends on the combination of
all of these settings. So once you
understand what each control does, it's much easier to
predict what effect it will have on the adjustment
process.
The first thing to do is decide how to make your adjustments.
Either
in Time, or by Frames. This affects all changes
to Event size, Overlap or Gap length, and Fade
In/Out duration and Fade Type. If the Selected Events Only
checkbox is checked, only the selected Events on the
Track will be affected.
The "Ignore" checkboxes just to the left of the Event Size, Overlap Size - Fade In/Out Size, and
Gap Size
input fields will prevent these field values from being
applied to Events when the Adjust Events button is pressed.
If you're working with A / V clips in Vegas, you've
probably invested a lot of time adjusting the length of
each clip in the Vegas Timeline. If you
later use Timeline Tools to adjust all your clips for
position, overlap, gaps and fade curves, you don't want
the clip length to be changed. This is what the
"Ignore" checkboxes do. Simple check the Ignore
Event Size checkbox, and your clips will be arranged
without changing their lengths. On the other
hand, if you're working with hundreds of Image files in
a Slideshow Project you probably want Timeline Tools to
adjust all the Image lengths to the same value such as 5
or 6 seconds per picture. In this case
simply leave the "Ignore' checkboxes unchecked.
Note: If an Event has the Vegas Locked
property set, and the
Use Fixed not Locked property to prevent Event Length
changes option is not enabled, the event will be moved in the
Timeline along with any other Events when the Adjust
Events button is pressed; but its Length will not be adjusted. A Locked Event is like having the
Event Size "Ignore" checkbox checked for a specific
Event. A typical use case for this
scenario would be in a Slideshow Project where you want
certain photos to have a different lengths than the rest
of the photos. By adjusting these photos and
setting their Locked properties, they will NOT have
their lengths altered if you should later decide to
change ALL the lengths of the other photos.
This is one way to accomplish this: First set all
your photos to the same length with gaps or overlaps.
Next, Select an Event you want to change the length
setting, then (1) Check the Selected Events Only
checkbox, (2) Check the Shift Trailing Events
checkbox, (3) Enter the new Event length in the Event
Size input field, (4) press the Adjust Events
button, (5) and lastly set the Selected Events Lock
Switch setting. Repeat this for each Event
that you want set to a different length than the rest.
From now on if you change the Event Size value and
reapply it to ALL Timeline Events, all will be modified
except those with their Locked property set true.
The "- Ignore -" Fade Type selection
operates similar to the "Ignore" checkboxes in that it prevents
Timeline Tools from making changes to existing Fade Type
settings for Fade In/Out size or Type.
- Relative Event
size change. If unchecked, the Event
size value will be used to set the absolute
length of the Event in Time or Frames. If
checked, Event size will
be increased by the length of the specified
amount of Time or Frames. Entering a negative size value reduces the length of the Event by the specified
amount. If checked, a value of zero
causes no change to Event length.
- Force no Event
Overlap. If checked, Events will not be
overlapped and the Overlap size input box
will change to Fade In/Out size allowing you
to set the length and type of the Event Fade
In/Out curve that will be placed at the start and
end of each Event. Also, you can enter a
value in the Gap size field if you want to add a gap
between your Events. If unchecked, the
Overlap size value will set the amount of
overlap between adjacent Events. Fade
In/Out curve type is set using the Fade Type drop down list.
Adjust Events.
This button applies the Event configuration settings
in Sections (3) &
(4) to the targeted Events on the Selected Track.
When the Timeline Tools window has focus,
this button can be invoked by pressing the Ctrl-Alt-E
keys.
Section
(5) (Fig. 4) lets you
configure external media editing tools. These tools can be invoked to edit Media
files used in a Vegas Project. You
can add tools and specify the Media types they work
with; either Audio or Video. You can also
specify if the tool is capable of accepting multiple
file names on the command line to open multiple files at
once. You can also
delete any of the tools you've added to the lists, or
change the tools settings. Configured Tools must be
capable of opening up a Media file passed to them on the command
line, or they will not function properly when used here.
Most editing programs support this. If
your default Video or Audio editing programs ( the
programs associated with Video, Graphics, and Audio file
extensions ) can accept multiple files on the command
line, check the associated checkboxes just below the
editor list.
To add a tool, press the Add Tool button.
In the form
that appears you must enter: The tool Name, The file path
where the Tool is located, and the type of
Media this tool edits. Additionally
you can specify if the tool is capable of accepting more
than one file name on the Command Line; and if the tool
should be the one that's opened by pressing the
Ctrl-Alt-X Hot Keys. The Tool Name is the
name that appears in the list of external Tools in
section (5).
Note: You can drag a file from Windows Explorer
into the Location input field to specify the
program as an external media editor.
If the Accepts multiple files checkbox is
checked, the word [multi] appears next to the
tool name in the list. If the Open using
Ctrl-Alt-X checkbox is checked, an asterisk
character "*" appears next to the tool name in the list.
To edit a tool that is already in the list, simply
double-click the tool item in the listbox.
The Video Tools, and
Audio Tools radio buttons let you filter the list to
show the tools you have configured for those Media
types.
Section
(6) is where you make changes
to the
Timeline Tools option settings. The options
are as follows:
- Vegas Cursor
tracks the selected Event table item.
When checked (default True), selecting an item
in the display Table in the Track Event Info
tab, automatically positions the Vegas Cursor to the
associated Timeline Event.
- Highlighted Event Grid items automatically
Select Timeline Events. This
option is useful if you frequently select items in
the Main Display Grid that you intend to select in
the Vegas Timeline. This can be very
useful if you're using the
PlugIn Dialog, or Timeline Tools Hot Keys to
invoke a change to the Vegas selected Events.
- Tracking positions Vegas Cursor to center of Event.
This option is used to refine the positioning of the
Vegas timeline cursor if option (1) is enabled. When
checked (default False) selecting an item
in the display Table will move the cursor to
the center of the associated Event. If
unchecked, the Cursor is moved to the Start of the
Event. This is useful if you have
overlapped Events. Because positioning
the cursor to the start of an Event will actually
display the previous Event in the Vegas preview
window.
- Always keep
Vegas Cursor visible in Timeline Window.
When checked (default False) any action that
moves the Vegas cursor in the Timeline will also
tell Vegas to scroll the Timeline window, if needed, to keep the
Vegas Cursor position in view in the Timeline window.
- Configuration
settings Loaded and Saved by Project. If
checked (default True), all of the Timeline
Tools settings (except options and external tools)
are saved in a Timeline Tools configuration file in the
currently open Vegas
Project subdirectory. This makes all of
these settings Project specific. If not
checked, all settings are saved in the Timeline
Tools data directory and are global to every
Project. This could lead to some
unexpected results, so I strongly suggest you use
the default setting to keep the program
Configuration Settings Project
Specific.
- Check for newer version
of program at startup. When Timeline Tools
is first started, either from the Vegas Toolbar
button or automatically if it was running when Vegas
was shut down, the program will check for the
availability of a newer version of the program than
what is currently installed and running.
If found, a message will be displayed showing both
your current version, and what is available for
download. If you want to download and
upgrade the program, you must first shut down Sony
Vegas before running the Setup program
- Dbl-Click Event Table
item deselects all other Events.
Allows you to double-click an Event Table item,
making it the sole selected item in the Table.
This is useful if you will be making adjustments
using any other Timeline Tools feature that operates
on selected Events.
- Cursor stack selection
highlights Event table entry. This
causes the Event table item that's associated with
the Cursor Stack position to be highlighted and
scrolled into view when the cursor stack item is
selected. This is useful for moving
Events from one location to another that are greatly
separated. Find the target Event where
you will be moving the source Event(s), and add it's
position to the Cursor Stack. Then find
the source Event(s) and select them. Use
the Cursor Stack dropdown to move back to the target
Event. Then right-click and choose the
Move Event option.
- Make Leading and Trailing Random Transitions
different. If you will be
adding Random Transitions to the Start and End of
your Events, this will tell the program that you
want the two Transitions to be different.
A Random Transition will be generated for each.
If this option is disabled, both the Start and End
Transitions will be the same.
- Enable Project Notes Editor.
When checked, the Project Notes Editor is enabled
and will open and save a Project Notes file in the
Vegas Project subdirectory. The Notes
file is a standard Rich Text Format (.RTF) file.
- Lock Envelope Points to Events.
This option behaves similar to the Vegas toolbar
button labeled "Lock Envelopes to Events".
If enabled (the default state), Events that are
moved, using the Main Display Grid Event Move
feature, will
also bring along any Points on any Envelope that are
present within the Event.
Vegas will move points with an Event if the Lock
Envelopes To Events option is selected.
But this feature does not work if Events are moved
using any of the context menu Move options in the
Main Display Grid. For this you must
have Lock Envelope Points to Events enabled.
Timeline
Tools follows the same rules used by Vegas.
If Events are overlapped, Points that exist from the
start of the selected Event, to the start of the following
overlapped Event will be moved with the event.
Points in the overlap area of the selected Event and
the following Event are considered to be
located in the following Event.
-
Create Auto-Save backup on file save if
enabled. If you have enabled
both the Auto Save
Project feature, and this Option selection, a specially
named variation of an Auto Save Project Backup will be created
when you manually save the Vegas Project from the
File menu, or Toolbar Save Button.
The specially named Auto Save backup will be similar
to other Auto Save backup file names, but will have "Manual Save" added
after the Date and Time.
-
Add, Insert or Replace Selected PlugIn Without User
Verification. The default state
of this option is False. If
checked, you will NOT be prompted to verify the
PlugIn Dialog action to
Add, Insert or Replace the Selected PlugIn.
- Preview
Inactive Takes when mouse is over Inactive Take
Cell. This option is only needed if
you employ multiple Takes in your Video or Graphic
Image Events. To use this feature you
must first click on the Event in the main display
grid that contains multiple Takes, then position the Vegas Cursor over the
Take Cell in the grid of the Event
Take you want to preview. The Vegas preview
window will normally be displaying the Active Take. When you move
the Mouse Cursor over an Inactive Take cell in the
main display grid, the Vegas Preview Window
switches to display the Inactive Take; as shown
below.
The Active Take will be restored after about 5 seconds if the
Mouse isn't moved over another Inactive Take Cell.
If this option is disabled, you can still force the
popup window appear if you hold down the Ctrl
Key before moving the mouse over an Inactive Take
Cell.
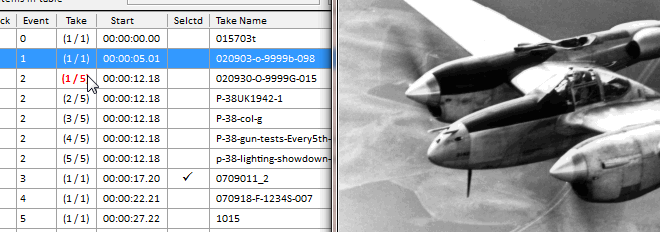 |
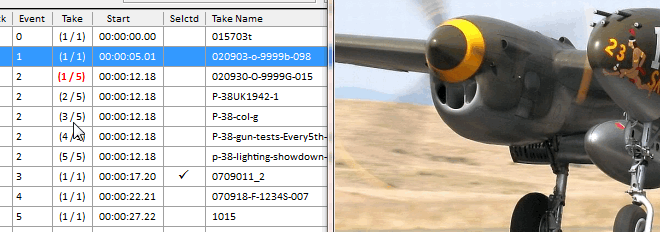 |
- Create Media Tags Backup with
Project Backup. The default state of
this option is False. If enabled, a
Media Tag Backup file will be created whenever a
regular Project Backup file would be created when
Autosave is enabled.
-
Use Fixed not Locked property to prevent Event
Length changes. When Events are being
Adjusted in the Track Tools & Option Tab,
setting an Events Locked Property True, will prevent
any adjustments from being made to an Events Length.
If This option is enabled, the Locked Property will
be ignored, and instead the Events Fixed Property will
determine if Event Lengths will be preserved.
The Fixed Property is a Timeline Tools custom Event
Property that's modified using the Timeline Tools
Event Property Editor. (default False)
- Auto Save PlugIn usage Report when Project is
closed. If enabled, Timeline
Tools automatically saves a PlugIn usage report
using the last settings specified in the
Export Project PlugIn Usage Report form,
opened from the Context
Menu of the PlugIn Tree in the Vegas PlugIns
Tab. If you create the more detailed
List of PlugIns used by Vegas objects
report, this can take a long time generate.
If you have this option enabled I strongly recommend
that you select the shorter Overall list of
used PlugIns report and leave it like that
whenever this option is enabled.
-
Only Refresh Event Group Display when button
is pushed. If enabled, the
Track Extras Tab Event Group Associations
display will only be updated if the Refresh Event
Group Display button is pressed. Enabling
this option can speed up loading your Project in
some case for large complex Projects that, for
example, employ nested .VEG files.
The following option settings
control which Columns are shown, or hidden in the Event
Table in the Track Event Info Tab. This
allows you to change the display to only show
information that interests you.
- Show Track Number. (default True)
- Show Event Number. (default True)
- Show Event Take Number.
If this option is disabled, only Active Takes will
be displayed in the main grid.
Enable this option if you want to show all Takes
associated with an Event. Note: When
Enabled, the Active Take is shown in a Bold Red Font. Also
Note: Sony Vegas Pro does not inform
Extension programs like Timeline Tools when you've changed
the Active Take. You must press the Refresh Table button to reflect the change in
the grid. (default False)
- Show Event Start Time. (default True)
- Show Event Length. (default False)
- Show Event Selection
State. (default True)
- Show Event Locked State. (default False)
- Show Fixed Property
State. (default false ). Shows
if the Timeline Tools custom Fixed property is
enabled.
- Show Event Active Take Name. (default True)
- Show Event Media
Size. (default True)
Video media displays Width x Height. Audio
Media displays Length.
- Show Event Plug-Ins. (default True)
- Show Event Media Path. (default False)
- Show Event Media Tags. (default
True)
[Top] [Tab
Index] |
|
|
|
|
Section
(1) lets you make
changes to Events to Remove or Restore Pan / Crop and
Video FX settings.
*Note* In the latest version
of Timeline Tools, all of the Section 1 options (shown
as checkboxes in Figure 5 above) have been moved into a
single Listbox.
You can choose to
completely remove All Pan / Crop Keyframes. Or you
can be selective and remove or apply specific settings
in the existing Keyframes. The types
of selective changes you can make are:
- Modify Media FX. If checked,
the following 3 settings apply to the events Active
Take Media, instead of the Event itself..
- Remove Video FX.
Removes all Video FX in the Selected Events in the
selected Track.
- Delete Video FX
Keyframes.
Keeps all Video FX in the Selected Events, but deletes all existing Keyframes.
- Delete all but Keyframe 0.
Keeps all Video FX in
the Selected Events, but deletes all
Keyframes except Keyframe 0.
- Remove Event Transitions.
Remove all Leading
and Trailing Transitions from the Selected Events in
the Selected Track.
- Remove Pan / Crop.
Removes all Pan / Crop Keyframes from the Selected
Events.
- Keep Pan / Crop Zero.
Removes all Pan / Crop Keyframes from the Selected
Events, but keeps Keyframe 0.
- Restore Media
Size. This restores the Media to the
way it appeared when it was first added to the
project. All Pan & Zoom Keyframes
are removed.
And the Media Aspect Ratio is returned to its
original size.
- Match Output
Aspect. This sets the Media
Aspect Ratio to match the project Aspect Ratio in
All Keyframes of the selected Events.
Simply stated, this zooms in on the media to
eliminate the vertical or horizontal black bars that
you see if the media size doesn't exactly match the
project size. Use this together
with Restore Media
Size to make sure the Project display is first
Reset before setting it to match the output Aspect
Ratio.
Wide media only. This
option is enabled only when the Match Output
Aspect option is selected. This
further modifies the behavior of the Match Output
Aspect option by only modifying Wide Media.
Wide Media is any media that has greater Width than
Height; or an Aspect Ratio greater than 1.0.
- Don't fit Large media.
By default, when Vegas adds Media to the Timeline it
automatically re-sizes the Media so that the largest
dimension exactly fits the Project dimension.
For example, a large image is effectively reduced in
size so that its largest dimension, either width or
height, exactly fits the Project dimensions.
Likewise, a smaller image is effectively expanded in
the same way. If your
media size is substantially larger than the Project
size, shrinking it down to the project resolution
can result in compression errors resulting in an
unacceptable picture. This option will
set the video size to the project dimensions,
allowing you to Pan and Zoom around your original
media
You can later use Timeline Tools or Pan / Crop to adjust if
necessary.
- Don't fit Small media.
By default, when Vegas adds Media to the Timeline it
automatically re-sizes the Media so that the largest
dimension exactly fits the Project dimension.
For example, a large image is effectively reduced in
size so that its largest dimension, either width or
height, exactly fits the Project dimensions.
Likewise, a smaller image is effectively expanded in
the same way. The problem is, if your
media size is substantially smaller than the Project
size, blowing it up can result in an unacceptably
grainy picture. This option will restore
small media (media that is smaller than the Project
size) back to it's original dimensions on screen.
You can later use Timeline Tools or Pan / Crop to adjust it if
necessary.
- Reset Rotation.
This resets the Rotation value assigned to
all the Keyframes in the selected Event(s) to 0.
- Set to Project Size.
This sets the Pan / Crop display size equal to the
size of the Project for all Selected Events.
This can be checked along with other options such as Match Output
Aspect to size the display to the Project size
and also make sure the Aspect Ratio is preserved to
fill the video frames. If you have
a very large image, this causes the display to zoom
into a small portion of the image.
- Apply Changes.
When
you press this button all of the options selected
above will be applied to the Events Selected in the
Vegas Timeline. When the Timeline Tools window has focus, this button
can be invoked by pressing the Ctrl-Alt-C
Hot Keys.
Section
(2) lets you make
adjustments to the Vegas Timeline Markers & Regions.
In this section you can:
- Set the list display Mode to show either Markers or Regions.
- Set the Format used to Import/Export
Markers/Regions.
- Set various Option Settings that include:
- Include Media Markers in the List. -
This will merge any Media Markers from Events in
the Selected Track into the Timeline Markers
list. The Media Markers will be
interleaved into the list so they appear in the
same Time sequence they appear in the Vegas
Timeline.
- Have the Vegas Cursor
automatically track the Marker/Region positions of
the selected item
in the Markers list. - If Regions are
selected, clicking on the same item in the list
will toggle the Vegas Cursor back and forth
between the Region's Start and End positions in
the Timeline.
- Display a Five Second Preview of the Vegas
project starting at the timeline position
of the selected
Marker/Region item in the list. -
This is similar to the Preview feature found in
the Vegas Project Media tab.
- Set focus to the Vegas
Tracks Window after selecting a Marker/Region
item from the list. - With this
option enabled, selecting a Marker/Region item
in the list immediately positions the Vegas
Cursor to the selected items timeline position,
then transfers focus to the Vegas Tracks Window.
From there you can perform any keystroke or
shuttle related command that you normally use to
Play/Stop or traverse Events. To
return to using the Timeline Tools, you'll have
to click back on its window.
- Include Region End
info. - If Region Mode is selected,
this will include the Region End information in
the Timeline Regions list, and also in the
Exported Regions text file.
- Include End + Length info. -
If Region Mode is selected,
this will include both the Region End and Length
information in the Timeline Regions list, and
also in the Exported Regions text file.
- Only display Label info. -
This option strips away
time position information from the list and
Exported text file, and only displays Labels.
- Include Labels. -
Normally, only position information is included
in Exported Markers/Regions. This option
includes Marker and Region labels if present.
- Export to DVDA .SFL
file. - This tells Timeline Tools
that you want to create a Sony DVD Architect
compatible .SFL file that's used to transfer
Vegas Marker positions to DVD Chapter points in DVD
Architect. When the Export
button is pressed, you'll be prompted to select
a previously rendered project video file that
was created with the same exact render settings
as the currently open project.
Later, when you import that video file into DVD
Architect, DVDA will find the .SFL file with the
same name as the video file, with .SFL appended,
and read that in to create Chapter points.
- Export to a
TMPGENC Mastering Works Keyframe file with the
extension .keyframe.
- Write a One Line file. -
This lets you Export Markers/Regions to a text
file that has no Linefeed terminators and the
end of each item. This is
essentially a file with one large line of text.
- You can search for Markers or Region labels.
Enter the search string into the text box above the
Listbox. Wildcard characters "*" and "?" are
supported. Matched items are highlighted
in the listbox. If you check the
Filter Marker / Region List instead of Highlighting
checkbox, The listbox will only be filled with
Markers/Regions that match the search criteria.
This lets you selected listbox, and move through the
filters list of matched items.
- Copy the Marker/Region
positions to the Cursor Stack in the Track Event
Info tab..
- Delete highlighted Markers or Regions from the popup Context
menu in the Markers listbox, or
by pressing the Delete key when the Markers
listbox has focus.
- Import Markers / Regions from a Text file.
Select the Mode, either Markers or Regions,
of the Text file you are Importing, then press the
Import Markers & Regions button to open the File
Selection dialog.
- Re-Sequence ALL Markers &
Regions so they start at 1 and continue in an
ascending numerical order down the timeline.
Markers and Regions as they appear on the Timeline
Before Re-Sequencing.

Markers and Regions as they appear on the Timeline
After Re-Sequencing.

Note: Vegas shares the assignment of numbers to Markers and Regions.
If you've created 3 Markers, then 3 Regions.
The Markers will have the numbers 1, 2, and 3.
And the Regions will have the numbers 4, 5, and 6.
If you add another Marker it will be number 7.
Re-ordering the Markers and Regions will result in
Markers and Regions displaying starting a "1" on the
left end of the Timeline, and continuing until the
highest number appears at right. Numbers will
be assigned to either a Marker or a Region in the
order it
appears in the Timeline.
- Select All ( highlight all Markers / Regions )
in the list.
- Clear All ( set the
highlight state of all Markers / Regions to None ).
- Refresh the list if something was changed in
Vegas and the list did not pick up the change.
- Decimate Markers / Regions. Press
the Decimate button to open the Decimation
Tool window. Note *** The Decimation
Tool does not itself delete any Markers / Regions
from the Vegas Timeline. What it does is
highlight Markers / Regions in the list on the
Markers, Regions & FX tab when you press the
Apply button. You delete the
highlighted items as normal using the Delete
button or context menu selection. In the
Decimation Tool window you can
select a specific Marker or Region where decimation
will begin; followed by choosing the Decimation
Factor to be applied to the Markers / Regions.
Decimation lets you reduce the number of Markers /
Regions that are present on the Vegas Timeline by
the Decimation Factor Number chosen.
Decimation leaves one Marker / Region remaining in
every group of Markers where the group size is
defined by the Decimation Factor. A
Factor of 4 will highlight 3 out of every 4 items in
the list. Likewise a Factor of 2 will
highlight every other item in the list; and so on.
The Markers/Regions listbox provides a popup context
menu that provides additional features.
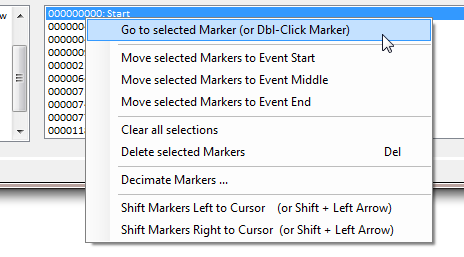
Many of the menu items in the context menu duplicate
existing features that can be invoked by pressing their
associated buttons. However, the menu
items that control how Markers are moved and shifted,
have no related button controls. The
following describes these unique popup context menu
items.
- Move selected Markers to Event Start / Middle /
End. - When you have a Marker that's
positioned over a selected Event in the Vegas
timeline, and that Event is in the selected Track in
the Timeline Tools Markers, Regions & FX tab,
these three options will reposition the Marker to
either the Start, Center or End of the Event.
- Shift Markers Left/Right to Cursor ( or by
pressing the Shift Left/Right Arrow keys ). -
This feature lets you perform a relational
repositioning of the start location one or more
Markers/Regions with a single key press or mouse
click. This feature behaves
identically to the Shift Points to Cursor
feature in the Track Extras tab.
All the selected Markers/Regions are moved a
relative distance from the closest qualified
Marker/Region to the Vegas Cursor.
Consider the following image:
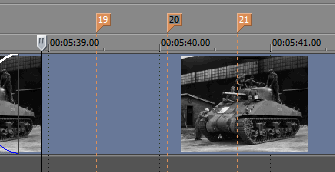
Here we have three Markers; 19, 20, & 21.
The Vegas Cursor is to the left of all three of the
markers. If all three Markers are
selected in the Markers listbox, and the Shift
Markers Left to Cursor menu item is selected,
Marker 19 is moved to the timeline position of the
Vegas Cursor, bringing Markers 20 and 21 along with
it, while maintaining their relative time spacing.
In this scenario Marker 19 is the qualified Marker
because, when shifting Markers left, Marker 19 is
the closest Marker to the Cursor without being left
of it in the timeline. In other
words, when shifting Left, the first selected Marker
to the Right of the Cursor is the qualified Marker.
And the relative Time difference between the Vegas
Cursor and Qualified Marker becomes the Time
interval that's added to all selected Markers,
causing them to shift by that same relative amount
of time. If the Vegas cursor was
positioned halfway between Marker 19 and 20, and the
Shift Left menu item was selected, Marker 20 would
be the Qualified Marker. In this case,
the time difference between the Vegas Cursor and
Marker 20 would be the amount of time that all three
Markers would be shifted Left.
In this same scenario, if the Shift Markers
Right to Cursor menu item was selected, all
three selected Markers are already to the Right of
the Vegas Cursor. To shift any Markers
Right or Left, there must be at least one qualified
Marker; in this case to the Left of the Vegas
Cursor. Since there are none in this
scenario, nothing is moved.
Section
(3) lets you add
new Markers to the Timeline based on the starting
location of the Events on the selected Track.
You can add Markers to the Start of all Events, or you can add
Markers to the Start of all the Events, except for the
Start of the First Event, and the End of
the last Event. This option is
useful if you're using Markers to create Chapter points
for the production of a DVD. Lastly,
you can import Markers or Regions from a text file that
can be a file that was created by Exporting Markers or
Regions. Simply select the Mode radio
buttons (Markers or Regions) of the type of text file
you expect to import. If desired you can add
an offset value in Seconds to be added to the Marker and
Region positions contained in the text file.
You can also Export the Marker
or Region positions to a text file in the project
subdirectory, either as Frame Numbers or Timecode.
You also have the option of exporting Marker or
Regions to a DVD Architect .SFL file or to a
TMPGENC Mastering Works Keyframe file with the extension
.keyframe.. Exporting Markers is useful if you author a DVD
using a program
that accepts input from a text file for the creation
of DVD Chapter Points. If you want, you
can include the Marker or Region label in the exported
text file. And you can chose to write everything on a
single line in the file, or multiple lines.
Before exporting your Marker or Region information you
must select the items in the list that you want to
Export.
To export items in the list to a
text file:
- Press the Select All button,
or
just highlight the specific list items targeted for Export.
- Select the Include
Labels or any other desired Marker & Regions
Option.
- Press the Export Selected Markers & Regions
button.
- Select the desired Folder and File name from the
Dialog, and press Ok.
To export items in the list to a DVD Architect
.SFL file:
- Check the Export to DVDA .SFL file entry in the Marker
& Regions Options list.
- Press the Select All button,
or just highlight the specific list items targeted for Export.
- Press the Export Selected Markers &
Regions button.
- Select the previously rendered video file
where the the newly created .SFL Chapters file
will be placed and named for. When
you open the rendered video file, DVD
Architect it will automatically import the .SFL
file and place chapter marks in the DVD title.
To export items in the list to a
TMPGENC Mastering Works Keyframe file:
- Check the Export to TMPGENC file entry in the Marker
& Regions Options list.
- Press the Select All button,
or
just highlight the specific list items targeted for Export.
- Select the Include
Labels or any other desired Marker & Regions
Option.
- Press the Export Selected Markers & Regions
button.
- Select the desired Folder and File name from the
Dialog, and press Ok.
You can also have Timeline Tools Split the Events on the
selected Target Track that are located under a Selected
Marker or Region by choosing the item in the list, then
pressing the Split Evnts @ Markers button.
Create Audio CD
Lastly, if you're using Sony Vegas Pro to author an
Audio CD, Timeline Tools will automatically prepare your
selected Audio Track for burning a Disk-at-once Audio
CD. First, select the Audio Track that
contains all the Events that will become CD Tracks from
the Select Target Track list in the upper right
section of the Markers, Regions & FX Tab.
Next, click the Add CD Event Regions button to
automatically Layout the selected audio track.
This action adds Regions to the Audio CD Track at the
top of the Vegas Timeline that bracket all the Audio
Events in the selected track. Name the
Regions to assign names to your Audio Tracks. Finally,
select the Burn Disc / Disk-at-once, option from
the Vegas Tools menu.
|
Audio Track
Events prior to Adding Audio CD Event Regions
 |
|
Audio Track
Events after Adding Audio CD Event Regions
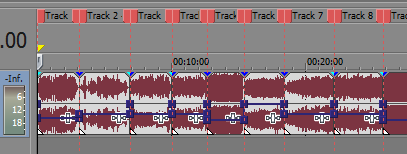 |
[Top] [Tab
Index] |
|
|
|
| The
Track Extras tab (Fig. 6) consists of
5
separate sections.
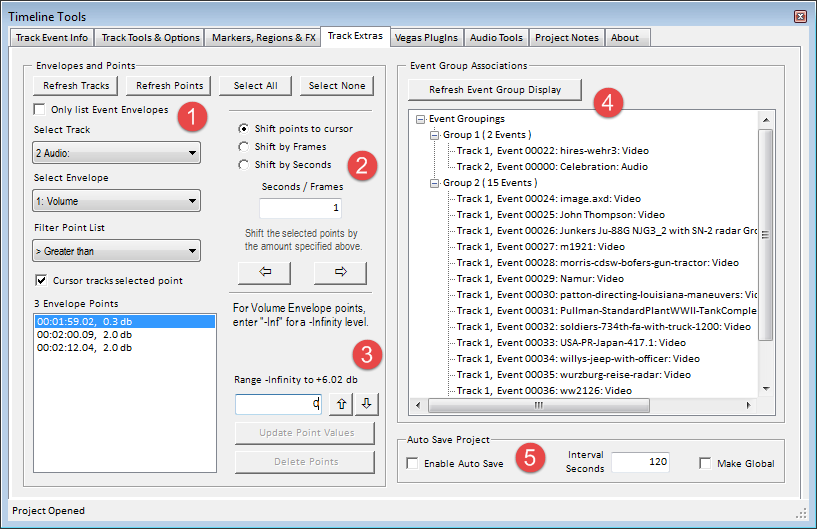 |
|
Figure
6 |
Section (1) lets you see a
list of available Tracks and BusTracks, and the Envelopes and Envelope Points that
are associated with them. You
first select the Track, then select the Envelope type
assigned with the Track. This shows you a list of
all points added to that Envelope. If
you double-click a point in the list, or right-click on
the list, you can move the Vegas timeline cursor to the
selected point. If you have Cursor
tracks selected point checked, clicking on a point
in the list will automatically move the Vegas cursor to
that location on the timeline.
This section also allows you to filter the list of
displayed points based on the filter setting and a value
entered in the input box that's also used to modify
point values. In the example shown
above, the > Greater Than filter setting was
selected, and a value of 0 was entered in the
Input Box. In this example Zero will display
all the Points in the Volume Envelope. To apply this filter, first select the
> Greater Than filter
setting. Then enter your filter value; in
this case Zero and press the Enter key. You
can also press the Refresh Points button to refresh the list of
filtered points. The resultant filtered list
of points can now be selectively highlighted and their
values modified if desired. Note: The
Update Point Values and Delete Points buttons are
disabled if the filter selection is anything other than
None. Reset the filter selection to None if
you need to delete or modify the filtered points.
In the above example, If you select the
Only list Event Envelopes option, the
Select Track dropdown list shows both the Track and Event on that Track, that
contain Event Envelopes. Select the
Track/Event pair to view the list of Envelopes assigned
to that pair.
If you right-click on the Point List, you will see
the popup context menu shown below:
-
Move Vegas cursor to
first Selected Point in list. If you
are not automatically tracking the selected point,
this menu option will move the Vegas cursor to the
location on the timeline of the selected point.
-
Highlight List
Points contained in Selected Events.
If you select Events in the timeline by clicking on
them directly or by selecting them from the main
display table in the Track Event Info tab, selecting
this menu option will highlight any points in the
list that exist on the timeline in the timeframe
occupied by the selected events. In
other words, it will highlight points that are
coincident with the selected Events on the timeline.
-
Select all Track
Events that contain Points highlighted in the List.
This is the reverse of the menu option just
described. This will selected all Track
Events that are coincident in the timeline with the
points that are highlighted in the list.
 |
| Context Menu for Track Extras
Point List |
Section (2) allows you to
change the location of the Envelope Points you selected in section
(1). You can
move a single point, or groups of points together with a
simple mouse click.
First, select the Point(s) you want to move;
two
buttons allow you to select all or none of the Points.
You can also select the Points directly by highlighting
the Points displayed in the Envelope Points listbox.
Next, choose how you
want to move the Points. Your options are to:
(1)
Shift points to the Vegas Cursor position, (2) Shift
points by
a number of Frames, (3) or Shift points by
a number of Seconds. If you selected by
Frames or by Seconds, enter a value in
the selected units of frames or time in seconds.
If you selected Shift points to cursor you must
position the Vegas Cursor to the position in the
timeline where you want to move the points.
The following rules are followed when shifting points to
the Vegas Cursor. We'll assume the Shift Left
button has been pressed:
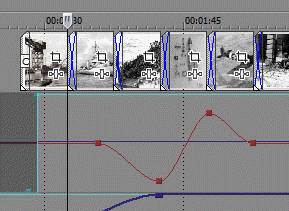 |
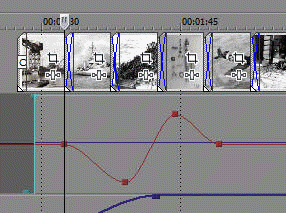 |
If the
Vegas cursor is to the left of all the selected
points on the timeline, and the Shift Left
button is pressed. The Leftmost
point (excluding point 0) is shifted left to the
Vegas Cursor position. along with all of the
other selected points. All points maintain
their original relative spacing, and their
amplitudes are unchanged.
The same is true if the Vegas Cursor is to
the right of all selected points. The
Rightmost point is shifted to the cursor, along
with all of the other selected points.
|
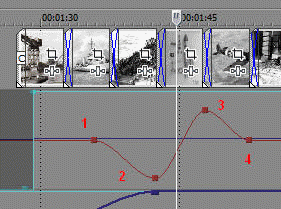 |
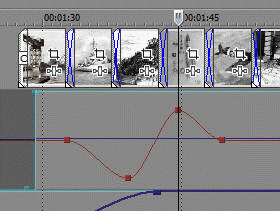 |
If the Vegas cursor is placed within a group of
selected Envelope points, and the Shift Left
button is pressed, the following rule applies:
The utility starts looking at selected points
and compares their positions to the Vegas
cursor. It skips over points left of the Vegas Cursor (points 1
& 2). When a
point to the right of the cursor (point 3) is
found, the program calculates the difference in position
between the point and the cursor, then shifts
all the points left by that amount. This same
algorithm is applied if the Shift Right button
was pressed. Points are skipped
until one is found to the left of the Vegas
cursor, then the difference in position is
applied to all the selected points, shifting
them all to the right. |
If you selected by
Frames or by Seconds, simply click
the Left or Right arrow button to shift all the
highlighted
Points left or right on the Timeline by the amount
of Frames or Seconds entered in the Seconds / Frames input box.
Note: Point 0
is special in Vegas and can not be shifted.
If selected, it will be ignored. Also, points cannot be shifted past the first
or last frame of the Envelope. For normal
Envelopes this is the first and last frame of the
project. For Event Envelopes, this is the
first and last frame of the Event.
Section (3) allows you to
make changes to Point magnitudes, or initiate a Point
Filtering action. To change Point
Magnitudes, first
select the Points you want to modify in the listbox.
Then either: (a) Enter a new value for the selected Point(s) in the
Input
Box, and press the Update Point Values
button, or (b) Enter a new value in the
Input
Box for the amount that you want you Increase or
Decrease the selected Point values, then press either the
Up Arrow or Down Arrow button to change
the selected Points by the specified value.
If you are performing action (a), you can press
the Enter Key and typing in your new value in the
Input box only if the Filter Point List
selection is set to None. If
the Filter Point List selection is set to anything other
than None, pressing the Enter key will filter the
Point List using the selected Filter and Comparison in
the Input Box value.
For Volume Envelope
Points enter the string -Inf in the entry box for a
-Infinity level. For a Mute Envelope, enter
0 for Muted, and 1 for Not Muted.
For Motion Blur Points enter a number of frames.
For Super Sampling enter the number of Samples. For all other Points, simply enter the numeric value of the
Point, without any units such as "db",
or "%".
Section (4) provides you
with a quick overview of all the Event Group assignments
that Vegas is currently using. This allows
you to make decisions on how you may want to alter these
Event groupings. To refresh the list,
press the Refresh Event Group Display button.
*Note: This list may appear blank when Vegas starts if
you have the "Only
Refresh Event Group Display when button is pushed"
option enabled in the Track Tools and Options Tab.
Section
(5)
Auto Save allows you to set a time interval at which your Project
will be automatically saved if you had made changes to
it since the last autosave interval. This feature
does NOT overwrite your current .VEG project file. It
renames your current open .VEG project file with the
current Date and Time appended to the base Project file name,
followed by a
regular Save action on your project.
In this manner you will end up with a series of .VEG files
providing a history of the state of
your project at each autosave action.
When your project is ultimately finished, simply delete any of the autosave .VEG files that you no longer wish to keep.
Selecting the Make Global option, will make the
current Auto Save settings the default for all Vegas
Projects opened in Timeline Tools.
Auto Save provides an additional optional feature that
can create an Auto Save backup when you manually Save
your Project from the Vegas File menu or Toolbar Button.
Refer to the
Timeline Tools Option settings for more information.
Note:
This feature only works if Timeline Tools is open and
running. [Top] [Tab
Index] |
|
|
|
The
Vegas PlugIns tab (Fig. 7) consists of 4
separate sections.
|
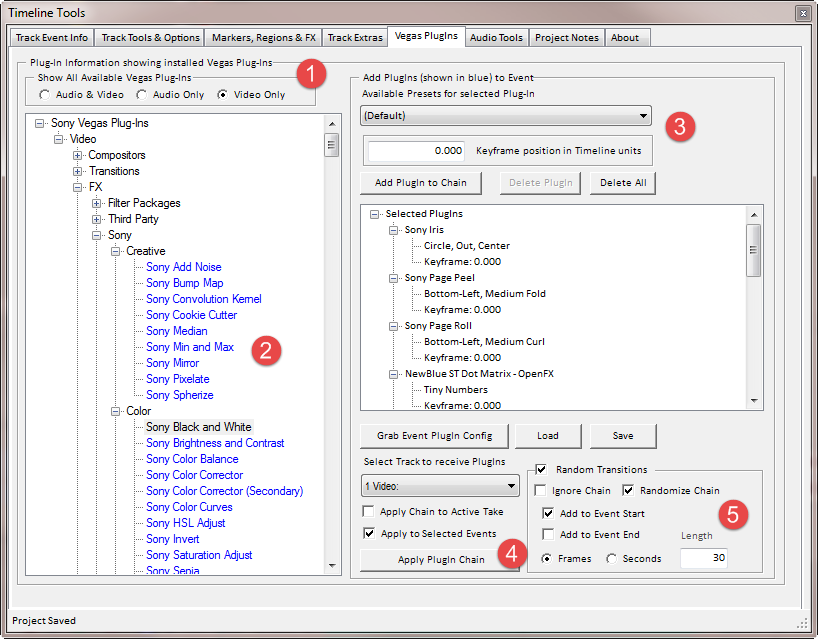 |
|
Figure
7 |
The Vegas PlugIns Tab displays a
tree view of all the Vegas Plug-Ins that have been installed
on your computer. It also allows you to
select and apply one or more Video PlugIns to targeted
Video Track Events.
Section (1) filters the
list of PlugIns that appear in the tree.
You can view All available Vegas PlugIns, only Audio PlugIns, or
only Video PlugIns. Video only, is
selected by default.
Section (2) allows you to
select a PlugIn of interest. Note: only
Vegas plug-ins that are shown in blue can be applied to
Events. If you Select a Blue colored
PlugIn from the list, you have several choices of what
you can do with that PlugIn:
- You can add it to the PlugIn Chain in the right
half of the tab to build up a group of PlugIns that you
can apply to targeted Events. See
Section (3) for
details.
- You can Delete the Selected PlugIn from one or
more targeted Events.
- You can Add, Insert or Replace an existing
PlugIn with the Selected PlugIn in your Targeted Events.
Right-click on a Blue
item in the PlugIn list and the Context Menu gives you a
choice of Deleting, Adding, or Inserting the Selected
PlugIn. Or you can Replace the Selected PlugIn
with another. Additionally, clicking on a
Blue item in the list or anywhere in the PlugIn Tree
background, shows the menu item to Export a report
showing the PlugIns currently being used in your
Project. These include Audio, Video and Bus
Track level PlugIns. Audio & Video Event
level Transition PlugIns and Media PlugIns. And
Video Event PlugIns.
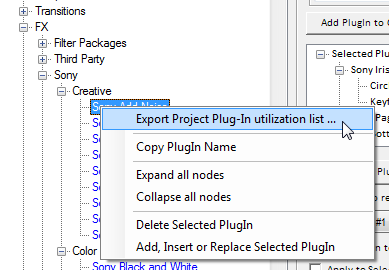
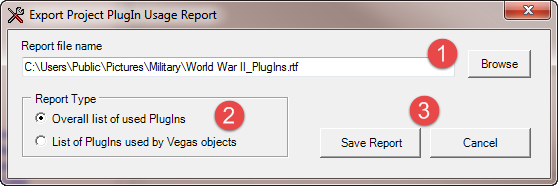
If you chose Export Project Plug-In utilization list
from the Context Menu, this opens the Export Project PlugIn Usage Report form.
(1) Enter a folder and file name to use for the Rich Text Formatted
Report. Or simply use the default name and location that
Timeline Tools creates from the Project name.
(2) Choose the Report Type and
(3) Press the Save Report
button. When done, the Report will be opened up
inside Windows Wordpad for your review. The two
Report types are:
- Overall list of used PlugIns -
This generates a Report that just shows all the
PlugIns that have been assigned to Vegas objects in
this Project. Vegas objects are things
like Tracks, Events, and Media.
- List of PlugIns used by Vegas Objects -
This is a comprehensive Report that shows all of the
Vegas objects in your Project and any PlugIns that
are assigned to them. Note, this Report
can take a long time to Generate, especially if you
have many Tracks and hundreds of Events.
NOTE -- It is
NOT recommended that you leave this Report Type
selection active after Generating a Report if you
also have the Auto Save PlugIn
usage Report when Project is closed option enabled.
Otherwise when you Save your project, Open a new
project, or shut down Vegas, it may take a long time
to complete these actions while the PlugIn Report is
being created.
Along with
this feature there's a new Program Option added to the Option List
in the Track Tools & Options Tab. After you
create your first PlugIn Report by opening the Report form, the
settings you chose in the form will be saved. Later, if the "Auto Save PlugIn
usage Report when Project is closed" option is checked,
Timeline Tools will
automatically save a PlugIn usage Report whenever the Project is closed
or Vegas is shut down.
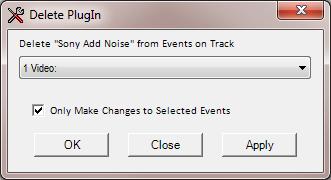 |
If you chose Delete Selected PlugIn
from the Context Menu, the Delete
PlugIn dialog at left is displayed. Chose
the Track containing the Events of interest.
Then set the option to delete the PlugIn for
ALL Events on the Track, or only those Events
that are Selected in the Timeline.
Press Apply to delete the PlugIn and
leave the dialog open. Press OK to
delete the PlugIn and close the dialog.
Or press Cancel to close the dialog
without any other action. |
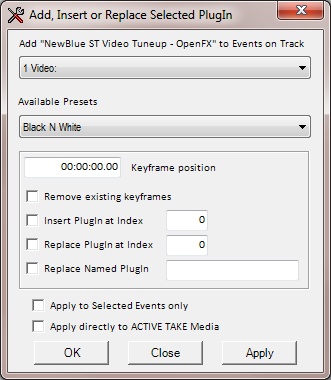 |
If you chose the Add, Insert or Replace
Selected PlugIn menu item and the PlugIn you
Selected in the List is a Video Effect, the
dialog at left is displayed.
This allows you to Chose the Track containing
the Events where you want to include the Selected
PlugIn, along with the desired PlugIn Preset and
Keyframe position. You can also
chose to Remove all existing Keyframes if the
Event already contains the PlugIn with other
Keyframes present.
To simply Add the Selected PlugIn to the end
of an Events PlugIn Chain, or to Add a new
Keyframe to an existing instance of the Selected
PlugIn, enter your Keyframe position and press
either OK or Apply.
To Insert the Selected PlugIn into the FX
PlugIn Chain of your targeted Events, Check the
Insert PlugIn at Index option, and enter the
Index position where you want the PlugIn
inserted. Index values are 0 - N,
where N is the number of PlugIns in the FX Chain
minus 1. For example, if you
want to insert the PlugIn into this Event FX
Chain where the Sony Sharpen FX resides, use an
Index value 1. The Color Corrector
(Secondary) PlugIn is at Index 0. And the
Brightness and Contrast PlugIn is at Index 2.
Entering a negative Index, or an Index greater
than N, will result in no action being taken.
Note, the value for N could be different for
each Event you have targeted depending on the
number of PlugIns already present in each.
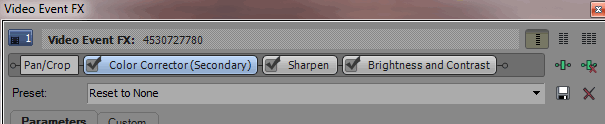
If you wish to Replace an existing PlugIn in
the FX Chain of your targeted Events, you can
either chose to Replace the PlugIn at a specific
Index position, or you can Replace a Named
PlugIn that is present in any position in the FX
Chain. To Replace the Indexed
PlugIn, Check the Replace PlugIn at Index
option and enter the Index value.
The Index value is the same as described for
Insert PlugIn option. To
Replace and existing Named PlugIn, Check the
Replace Named PlugIn option and enter the
name of the PlugIn that you want to replace.
If the Timeline Tools "Add,
Insert or Replace Selected PlugIn Without User
Verification" option is checked, you
will NOT be prompted to verify the action you've
selected when you press the OK or Apply buttons.
If you check the Only Make Changes to
Selected Events option, your changes will be
limited to only those Events selected in the
Vegas timeline. If you check
the Apply changes to Active Take Media
option, your changes will be applied to the
Active Take Media in the targeted Events.
Note: PlugIns added to the Active Take
Media, instead of the Event itself, will be
displayed in the color Red in the main display
grid. Because the color of the text
in a cell in the grid can only be a single
color, Transition PlugIns will also appear Red
even though they are attached to Events, not
Media. Also, Video FX applied to
Media will have priority being displayed in the
grid over Video FX applied to an Event, if both
exist at the same time. |
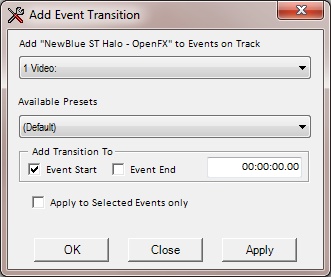 |
If you chose the Add, Insert or Replace
Selected PlugIn menu item and the PlugIn you
Selected in the List is a Video Transition, the
dialog at left is displayed.
This allows you to Chose the Track containing
the Events where you want the Selected Transition to
be applied, along with the Transition Preset and
your choice of applying the Transition to the
Leading, Trailing or Both edges of the targeted
Events. You can also adjust
the Transition length in Ruler Units within the limits imposed on Transitions by Sony
Vegas itself. |
Section (3)
is used to either create Custom FX
PlugIn Chains. Or it can be used to create Lists
of Selected Transitions that can be used as the
source set of Transitions that will be Randomized and
applied to targeted Events.
Custom FX PlugIn Chain:
A Custom PlugIn Chain can be
Edited, Saved, Recalled and applied to Events on the
Selected Track. This is similar to the Vegas
PlugIn Package mechanism, but the Chain configurations
are saved in an XML file in the Timeline Tools
application data directory, and are not subject to the
problems associated with upgrading or moving Vegas
installations. Simply copy the Timeline
Tolls application configuration XML file and everything
is immediately available.
When you select a PlugIn from
the Tree on the left side of the Tab, a list of
available Presets for that PlugIn appears in the
dropdown list of Presets at the Top of the right side of
the Tab. If you selected an
FX PlugIn, select a Preset, and enter a Time value in seconds where
you want to create a Keyframe of the PlugIn and Preset.
If you selected a Transition PlugIn, select a Preset,
and enter a Time value in seconds for the duration that
you want the PlugIn to run. Lastly choose where
you want to apply the Transition; to the Starting end of
the Event, or the End of the Event.
You can only have a maximum of two Transition PlugIns
assigned to an Event; one at each end.
Therefore you can not enter more than two Transitions
into any single PlugIn Chain. Transitions
can be identified by the "(T)" suffix on their name in
the tree.
- After you've selected your
PlugIn, press the Add PlugIn
to Chain button to add the PlugIn to the currently
visible chain. If you Right-Click a
PlugIn node in Selected PlugIns tree, a context menu
appears that allow you to Edit the Selected PlugIn or
make changes to the list of configured PlugIns.
You can also bring up a PlugIn for editing by
Double-Clicking the node name in the tree.
- To delete a PlugIn from the chain, select the
PlugIn name node in the tree at right, and press the
Delete PlugIn button.
- To delete ALL PlugIns from the chain, press the
Delete All button.
- You can also automatically
load the PlugIn Chain list by telling the program to
grab the Events PlugIn settings from the selected
timeline Event. To do this first select the
Track in the drop down list, then select an Event on
the timeline. Then press the Grab Event PlugIn Config button.
- You can also Save and Load
PlugIn configurations using the Load and Save
buttons. These configurations are stored
independent from the PlugIn chain visible in the tree.
The PlugIns visible in the tree are saved along with the project
configuration settings. The Saved PlugIn
chain configurations are saved in user named files.
Note: Grabbing
the PlugIn configuration directly from an Event will
not display the Preset that may have been used to
configure a Keyframe. You will need to
manually edit
the Event list and supply the appropriate Preset.
This is also true for Transitions that have been grabbed
from an Event.
This is a limitation of Sony Vegas.
List of Selected Transitions: This is
a list of user selected Transitions and Presets that can
be Edited, Saved, Recalled and Randomly applied to
targeted Events on the Selected Track. The
method for adding Transitions is exactly the same as
that for creating a Custom FX PlugIn Chain described
above. The difference being that you only
add Transitions to the list, rather than adding both FX
and Transitions. See section 5 below on the use of
Transition Lists. In
Section
(4) press the
Apply PlugIn
Chain button apply the PlugIn Chain to the appropriate Event(s) on the
selected Track. When the
Timeline Tools window has focus, the Apply
PlugIn Chain button can be invoked with an automatic
Apply to Selected Events setting made by
pressing the Ctrl-Alt-S Hot Keys.
Pressing the Ctrl-Alt-A Hot Keys applies the
Chain to ALL Events.
If the Apply Chain to Active Take option is
checked, all Video FX in the Chain will be applied to
the Active Take Media in the Targeted Events on the
Selected Track. Note: PlugIns added to
the Active Take Media, instead of the Event itself, will
be displayed in the color Red in the main display grid.
Because the color of the text in a cell in the grid can
only be a single color, Transition PlugIns will also
appear Red even though they are attached to Events, not
Media. Also, Video FX applied to Media will
have priority being displayed in the grid over Video FX
applied to an Event, if both exist at the same time.
Section (5)
allows you to add Random Transition Effects To one or
more targeted Events on the selected Track.
The Transition Effects used in the Random Transitions
feature comes from one of two sources; either the entire
inventory of installed Vegas Transition Effects, or a
selected group of Transition Effects in the loaded
Transition List. To apply Random Transitions,
first check the Random Transitions checkbox,
then select your source for the Transition Effects.
- Check the Ignore Chain checkbox to use
the entire Vegas inventory of installed Transition
Effects. This will only apply Random
Transitions to your targeted Events, and will not
apply the currently loaded PlugIn Chain if present.
Next you should select one or both of the checkboxes
to Add the Random transition to the Start and / or
End of the Event. Note: If
you have Overlapped Events, you only need apply
Transitions to the start of the Event.
If Events are Overlapped, the starting Transition
takes precedence, and hides the ending transition.
So in this case the end Transition is essentially
unused. Also, if you do not have
the Timeline Tools Make Leading and Trailing
Random Transitions different option enabled, the
Fade In and Fade Out Transitions will be the same on
each targeted Event. Lastly, you should
enter a value for the length of the Transitions in
either seconds or Frames.
- Check the Randomize Chain checkbox to
used the currently loaded List of Transition Effects
as the source for applying Random Transitions to
your targeted Events. Next you should
select one or both of the checkboxes to Add the
Random transition to the Start and / or End of the
Event. When the Randomize Chain checkbox is
checked, the Add to Event Start and Add
to Event End allow a Tri-State selection
of Checked, Unchecked, and Intermediate.
If Checked, Transitions will be added to the Event,
overriding any edge selection that was applied when
the Transition was added to the List. If
Unchecked, Transitions will NOT be added to
the Event, overriding any edge selection that was
applied when the Transition was added to the List.
If set to the Intermediate state, Transitions will
applied to the edge selections states created when
the Transition was added to the List.
Note: If you have Overlapped Events, you only need
apply Transitions to the start of the Event. If
Events are Overlapped, the starting Transition takes
precedence, and hides the ending transition. So in
this case the end Transition is essentially
unused. Also, if you do not have the Timeline
Tools Make Leading and Trailing Random
Transitions different option enabled, the Fade
In and Fade Out Transitions will be the same on each
targeted Event. Lastly, you should enter
a value for the length of the Transitions in either
seconds or Frames. This value overrides
any time value that was defined when the Transitions
were added to the list.
Using Random Transitions
Transitions are
Effects that can be inserted into the Envelope areas
at the leading and/or trailing edges of a Video Event.
Transitions provide special effects as Vegas moves from one piece of media to another.
These effects include Swirls, Wipes, Dissolves, etc.
Timeline Tools creates Random Transitions with
Randomly selected Presets on the Transitions.
These can be applied alone, or with the currently
displayed PlugIn Chain FX.
- If you choose to add Random Transitions to your
Events, this will override any Transitions that may
be present in the selected Events.
- Check the Random Transitions checkbox,
the check the Ignore Chain or Randomize
Chain checkbox in
the Random Transitions group at the bottom of the
Vegas PlugIns Tab.
- Check the appropriate check box to apply
Transitions to Event Leading and/or Trailing edges.
- Specify the duration in Seconds that you want
the Transition to run.
- Press the appropriate Apply button to modify
just selected Events, or ALL Events.
Notes: Sony Vegas Transitions have some quirks
that you should be aware of:
-
Transitions can be applied to both the leading
and trailing edges of and Event, but if you have
your Events overlapped, leading edge Transitions
have precedence over the trailing edge.

In the above image Two non-overlapped Events have
had random Transitions applied to their leading and
trailing edges.
-
In the following image
the second Event was dragged left to overlap with
the first. As you can see, the leading edge
Transition of the second event is the one that's
displayed as the images transition from the first to
the second Event.

-
Now a strange thing
happens. If you drag the second Event back
away from the first, so the Events are no longer
overlapped, the trailing edge Transition of the first
Event, and the leading Transition of the second
event appear to have disappeared. But
this isn't the case. They are still there, but
their envelope lengths have been set to zero.
You can drag the second Event so it again overlaps
the first, and you'll again see the leading edge
Transition of the second Event reappears.
To restore the Transitions to what they looked like
in the first example above; simply drag your
envelope as you would when you want to create a
normal Fade In or Fade Out. And you'll
see the Transitions reappear.

-
The following image
shows the envelope window being dragged open,
restoring the Transition name that appears in the
envelope area.
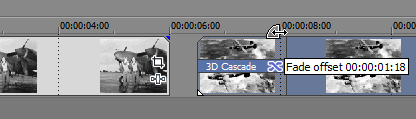
[Top] [Tab
Index]
The
Audio Tools tab
(Fig. 8) consists of 6 sections.
|
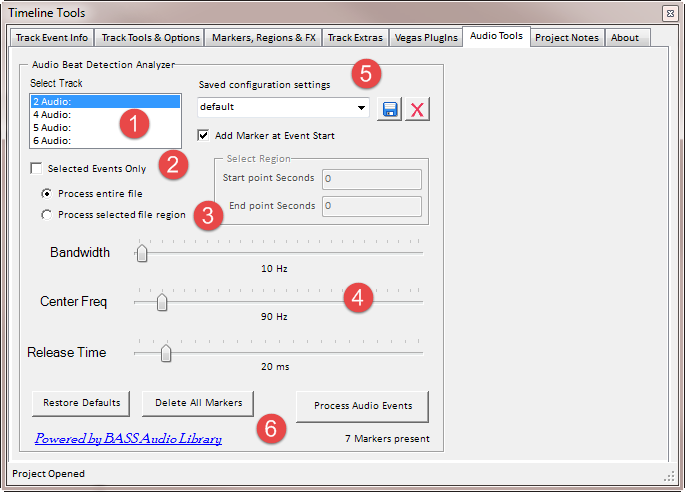 |
|
Figure
8 |
The Audio Tools tab provides a
unique new capability to Timeline Tools.
This feature is designed to analyze targeted Audio
Events in the Audio Track selected in the listbox [Item
1], for the purpose of detecting rhythmic beat positions
in the audio files. When the analysis is
finished, Vegas Timeline Markers are automatically laid out on the
Timeline at those beat positions. This
new feature, combined with the feature in the
Markers, Regions & FX tab to Decimate Markers
if needed, and the Track
Tools & Options tab to Align Events to Markers,
gives you the ability to automate the process of
creating rapid-fire Video Slideshows that change images
to the beat of the Active Take music file in the Audio
Event in the selected sound
track. This new Timeline Tools feature
relies heavily on the vast audio processing capabilities
that are available in the
BASS Audio Library;
an Audio library that has various licensing options
available to fit the needs of different software
developers.
Section (1)
Displays a list of all currently available Audio Tracks
in your Vegas Project.
Section (2)
Lets you chose to process either the Active Take in ALL
the Audio Events, or just the Active Take in the Audio
Events selected in the Vegas Timeline.
Section (3)
Lets you choose to process either the entire audio file,
or just a region within the file as defined by the entry
fields for Start and End point in Seconds. Note:
if more than one audio file will be processed at one
time, the same Start and End points will be applied
relative to the beginning of each targeted file.
Section (4)
This is where you make adjustments to the Three settings
the beat analyzer uses when processing audio files.
The settings are Bandwidth, Center Frequency,
and Release Time. The BASS
Audio Library describes how these settings work:
Beat detection is using a Band Pass Filter. A
band-pass filter is a device that passes frequencies
within a certain range and rejects (attenuates)
frequencies outside that range. So the
bandwidth parameter
defines the range around a center-frequency to include
in the beat detection algorithm. The
center frequency
parameter actually defines the center-frequency of the
band pass filter. Once a beat is detected, the
beat release time
parameter defines the time in milliseconds in which no
other beat will be detected, after that just detected
beat. Often you have kind-of
'double beats' in a drum set. So the
beat release time should
avoid a second (quickly repeated) beat if
detected.
Section (5)
Allows you to Save and Load Named sets of configuration
settings. As you play with this
feature of Timeline Tools, you'll discover that some
Audio files containing different segments of rhythm
and beats must be processed in sections using
different analyzer settings. By fine tuning
your settings for each segment of the audio file, you
can save each set of settings with different names.
For example "File X - Section 1", "File X -
Section
2", etc.
Section (6)
The final step after making all your adjustments is to
press the Process Audio Events button.
This starts the analyzer and places Markers on the Vegas
Timeline at the audio files beat positions.
As you become familiar with this new tool, you'll learn
that optimizing your settings for each audio file is a
trial and error process. You'll start with
the default settings, run the analyzer and examine where
the beat markers are placed. If this doesn't
look right, you can either press the Vegas Undo button to
remove the Markers, or click on the Delete All Markers
button. There is a label just below the
Process Audio Events button that indicates the total
number of Markers that exist on the Vegas Timeline.
When you decide you've
obtained the best settings possible, the next step is to
browse through the Markers and your selected Audio
Events, and manually Add any beat Markers to the Vegas
Timeline the analyzer
missed, and/or Delete
any extraneous ones the analyzer may have added.
Even though there's still manual tweaking involved
using this new tool, it will still save you many hours
of work over doing this entirely by hand.
As a tool to assist you in finding the optimum
settings for the Beat Analyzer I've found that Sony
Sound Forge can be very helpful. I enable
the Spectrum Analysis View, enable Real Time Monitoring,
and then turn down the Track display gain (the vertical
sliders to the left of the spectrum windows) to the
least sensitive setting. When I press
Play, the most pronounced beat frequencies are just
barely visible in the display above all the remaining
music frequencies. I should also
mention the most important thing to keep in mind when
picking a music track for your slideshow is that it must have a very discernable and pronounced beat.
Without a pronounced beat, you'll find it difficult to
find any combination of Analyzer settings that will
produce acceptable results. If I had to pick
a particular genre of music that works very well, it
would have to be 70's Disco Music. But,
thankfully, that doesn't mean you must limit yourself to
this music style.
When you're satisfied that all your Markers have been
laid out and manually adjusted and properly synced to your music,
the next step is to decide if the number of Markers
created by the Analyzer fits with the slideshow
presentation you have in mind. The Analyzer
typically produces hundreds of Markers. Maybe
there are more Markers at close intervals than you'd
like. If so, you can click on the
Markers, Regions & FX
tab and use the Decimate feature to reduce the
number of Markers to slow down the overall pace of slide
switching. Finally, the last step is to click on the Track
tools &
Options tab, and have Timeline Tools automatically
Size and Position your Images to the Beat Synced Markers
using the Align Events to Markers feature.
[Top] [Tab
Index]
The
Project Notes Tab.
Timeline Tools gives you the ability to save a unique
set of notes (or comments) for each project you work on.
Your project notes are saved in a Rich Text Format file
that has the same base name as your .veg Project file;
and is saved in the same subdirectory where your Vegas
.veg Project
file is located. This is the same method
used by some other tools that provide similar
functionality.
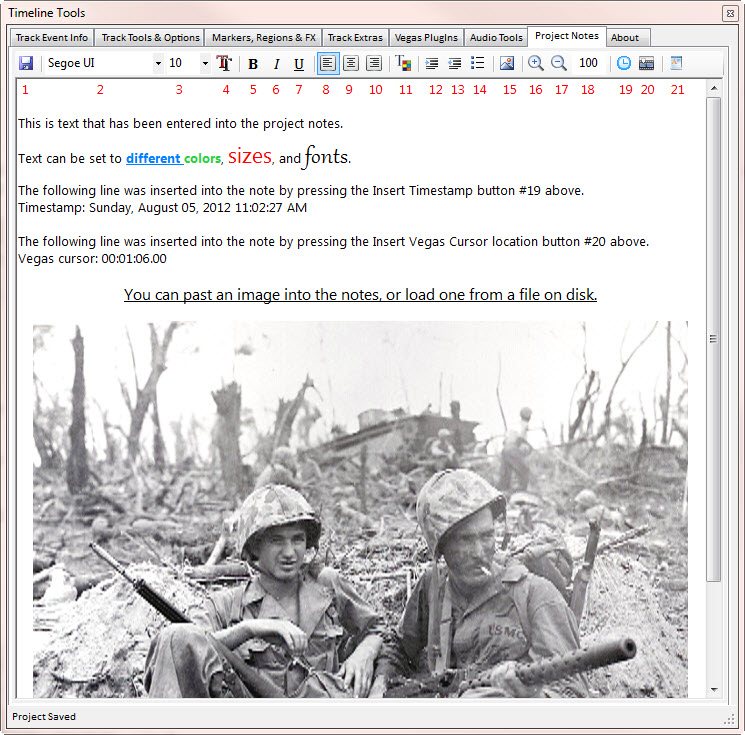
There are 21 items on the Project Notes toolbar.
Here is a description of what each item does.
- Save Project Notes. This
manually saves the contents of your notes to the
Project Notes file. Notes will be saved
automatically when your project is saved, or the
Timeline Tools extension is closed, or when Sony
Vegas Pro is shut down.
- Font Selection list. This is
a drop down list of all of the available fonts you
can use in your project notes. If you
select some text in your notes then select a new
font in this list, the selected text will use the
new font. This also displays the font of
the text under the text cursor.
-
Font Size list.
This is the list of font sizes that are available
for the selected font. This also
displays the font size of the text under the text
cursor.
-
Select Font dialog.
This button display the Font Selection dialog box
that allows you to select multiple Font attributes
at once.
-
Toggle Bold.
This toggles the Bold Font setting on and off.
This can change the bold state of selected text, or
set the Bold state of newly entered text.
-
Toggle Italics.
This toggles the Italics Font setting on and off.
This can change the Italics state of selected text, or
set the Italics state of newly entered text.
-
Toggle Underline.
This toggles the Underline Font setting on and off.
This can change the Underline state of selected text, or
set the Underline state of newly entered text.
-
Align Left.
This can change the text alignment of selected text, or
set the alignment of newly entered text.
-
Align Center.
This can change the text alignment of selected text, or
set the alignment of newly entered text.
-
Align Right.
This can change the text alignment of selected text, or
set the alignment of newly entered text.
-
Select Font Color.
Brings up the Font Color selection dialog box.
-
Increase Indent.
Increases the Indent of selected text.
-
Decrease Indent.
Decreases the Indent of selected text.
-
Toggle Bullets.
This toggles the selected text state between normal
paragraphs and a bulleted list.
-
Insert Picture From
File. Lets you import a graphic
image from a file into the note at the position of
the text cursor.
-
Zoom In.
This allows you to zoom into your notes by
increasing the document magnification level by 20%
every time the button is clicked.
-
Zoom Out.
This allows you to zoom out of your notes by
decreasing the document magnification level by 20%
every time the button is clicked.
-
Zoom Percentage.
This displays the current document magnification
level. 100% is Normal magnifications.
You can also change the magnification level by
entering a number into this field.
-
Insert Timestamp.
This inserts a Timestamp into the note at the
position of the text cursor.
-
Insert Vegas cursor
location. This inserts the Timecode
position of the Vegas cursor into the note at the
position of the text cursor.
-
Save notes and open
in Wordpad. This button saves your
notes to the project note file, then opens up that
file in Microsoft Wordpad.
In addition to the Project Notes toolbar,
right-clicking on the editor window brings up the
editors context menu. This provides the same
functionality of the toolbar, with the addition of a
few more options. Here is a description of
the additional features included in the context menu.
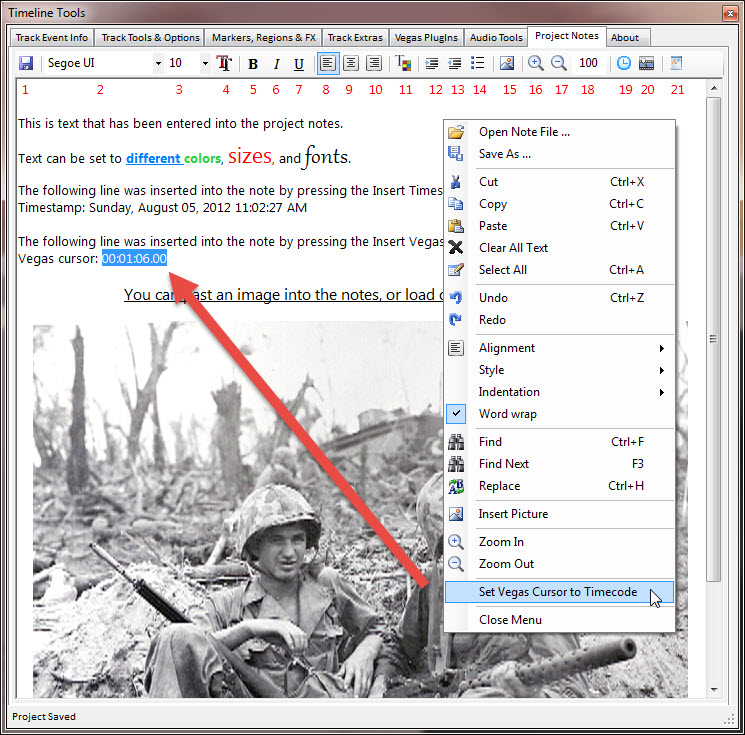
- Open Note File -
This allows you to import the contents of a Rich
Text Format (.RTF) file into your Project notes.
This replaces any content that you may already have
in your project notes.
- Save As - This lets you save
your notes to a Rich Text Format file other than the project note
file.
- Set Vegas Cursor to Timecode -
This menu item works with text you have selected in
the notes. If the selected text can be
interpreted as a valid Vegas Timecode, this menu
option becomes enabled. Selecting the
option interprets the selected text, converts it back to
a Timecode, and sets the Vegas cursor to that
position on the Timeline. This is the
reverse of pressing the Insert Vegas cursor
location button on the toolbar.
If you have another tool that performs this task
better than the one provided in Timeline Tools, you can
disable the Project Notes Editor from the
Timeline Tools Option
Settings.
[Top] [Tab
Index]
The About tab gives
information about the utility program, and lets you
manually check to see if a newer version is available.
From the About tab you can also file a problem report. In
the About Tab there are three buttons that will open
Windows Explorer to the (1) Timeline Tools Data
Subdirectory where the programs configuration and setup
information is stored, (2) the Timeline Tools
Installation Subdirectory, and (3) The currently opened
Project Subdirectory.
Timeline Tools now logs internal errors, and can send
a copy of the error log with your written summary of
your problem using your default email client program
such as Microsoft Outlook, etc.
[Top] [Tab
Index] |
|
|